Contents Menu Expand Light mode Dark mode Auto light/dark, in light mode Auto light/dark, in dark mode Skip to content
CrafterCMS v4.0.7
Light Logo Dark Logo
  • current
  • v4.1
  • v4.0
  • v3.1
  • Getting Started
    • Requirements and Supported Platforms
    • Quick Start Guide
    • Your First Project
  • Content Authors
    • Getting Started on Authoring
    • Navigating Around Crafter Studio
    • Working with Pages
    • Working with Assets
    • Content Author Search
    • Audience Targeting
    • Workflows
  • Developers
    • CrafterCMS Architecture
    • Content Modeling
      • Page Content Type
      • Component Content Type
    • Content Inheritance
    • Assets
      • Remote Assets
      • Asset Processing
    • Templates
      • FreeMarker (Templating) API
    • Experience Builder
    • Upgrading In Context Editing
    • Search with Elasticsearch
    • GraphQL
      • Working with GraphQL
      • Custom GraphQL Schema
    • Extensions
      • Blueprints
      • Plugins
        • Crafter Studio Sidebar Plugin Example
        • Crafter Studio Experience Builder Plugin Example
        • Crafter Studio Toolbar Plugin Example
        • Crafter Studio Dashboard Plugin Example
        • Crafter Studio Project Tools Plugin Example
        • Crafter Studio Navigation Menu Plugin Example
        • Building Form Engine Control Project Plugins
        • Building Form Engine Data Source Project Plugins
        • Crafter Studio Full Screen Plugin Example
      • Crafter Marketplace
    • Content Targeting
    • Redirects
    • Testing
    • Errors
    • DevContentOps
    • CrafterCMS
    • Crafter Docker Compose
    • Crafter Core
      • Crafter Core API
        • Clear
        • Clear All
        • Get Descriptor
        • Get Item
        • Get Children
        • Get Tree
    • Crafter Commons
    • Crafter Engine
      • JavaScript SDK
      • GraphQL
        • Working with GraphQL
        • Custom GraphQL Schema
      • Crafter Engine API
      • FreeMarker (Templating) API
      • Groovy API
    • Crafter Studio
      • Crafter Studio API
        • Crafter Studio API Version 1
          • Clear Configuration Cache (deprecated)
          • Create Site
          • Delete Site
          • Exists
          • Get Available Blueprints
          • Get Canned Message
          • Get Configuration (deprecated)
          • Get Site
          • Get Sites per User
          • Monitor Content
          • Write Configuration (deprecated)
          • Sync from Repo
          • Get User Permissions
          • Get User Roles
          • Publish Commits
          • Publish Status
          • Start Publisher
          • Stop Publisher
          • Publish Items
          • Reset Staging Publishing Target
          • Get User Activity
          • Post Activity
          • Copy Item
          • Cut Item
          • Get Items
          • Paste Item
          • Get Dependant Items
          • Get dependencies
          • Get Simple Dependencies
          • Calculate Dependencies
          • Bulk Go Live
          • Get Scheduled Items
          • Preview Sync
          • Change Template
          • Content Exists
          • Create Folder
          • Crop Image
          • Rename Folder
          • Get Content
          • Get Content at Path
          • Get Content Type
          • Get Content Types
          • Get Content Item
          • Get Item Orders
          • Get Item Versions
          • Get Items Tree
          • Get Next Item Order
          • Get Pages
          • Reorder Content Items
          • Revert Content Item
          • Unlock Content Item
          • Write Content
          • Get Available Languages
          • Get Loggers
          • Get UI Resource Override
          • Set Logger State
          • Create Jobs
          • Get Go Live Items
          • Get Workflow Affected Paths (deprecated)
          • Go Delete (deprecated)
          • Go Live
          • Reject
          • Request Publishing
          • Transcode
          • MediaConvert (deprecated)
          • AWS S3 Upload (deprecated)
    • Crafter Deployer
      • Crafter Deployer API
        • Create Target
        • Get Target
        • Get All Targets
        • Delete Target
        • Deploy Target
        • Deploy All Targets
        • Unlock Target
        • Recreate Index
        • Version
        • Status
        • Memory
    • Crafter Profile
      • Crafter Profile API
        • Create Access Token
        • Get Access Token
        • Get All Access Tokens
        • Delete Access Token
        • Create Tenant
        • Get Tenant
        • Update Tenant
        • Delete Tenant
        • Count Tenants
        • Get All Tenants
        • Verify New Profiles
        • Add Roles
        • Remove Roles
        • Add Attributes
        • Update Attributes
        • Remove Attributes
        • Create Profile
        • Update Profile
        • Verify Profile
        • Enable Profile
        • Disable Profile
        • Add Roles
        • Remove Roles
        • Get Attributes
        • Update Attributes
        • Remove Attributes
        • Delete Profile
        • Get Profile By Query
        • Get Profile
        • Get Profile By Username
        • Get Profile By Ticket
        • Get Profile Count
        • Get Profile Count By Query
        • Get Profiles By Query
        • Get Profiles By Ids
        • Get Profiles By Range
        • Get Profiles By Role
        • Get Profiles By Attribute Value
        • Reset Password
        • Change Password
        • Create Verification Token
        • Get Verification Token
        • Delete Verification Token
        • Upload Profile Attachment
        • Get Profile Attachment
        • Get All Profile Attachments
        • Get Profile Attachment Details
        • Authenticate
        • Create Ticket
        • Get Ticket
        • Invalidate Ticket
        • Create Persistent Login
        • Get Persistent Login
        • Refresh Persistent Login
        • Delete Persistent Login
        • Get Memory Stats
        • Get Status
        • Get Version
    • Crafter Social
      • Crafter Social API
        • Get Current Actions
        • Update Actions
        • Get All Social Contexts
        • Create Social Context
        • Add Profile To Social Context
        • Remove Profile from Social Context
        • Update Email Configuration
        • Get Email Configuration
        • Update Email Template
        • Get Email Template
        • Get Context Preferences
        • Update Context Preferences
        • Delete Context Preferences
        • Clear Cache
        • Create Comment
        • Update Comment
        • Delete Comment
        • Get Comment
        • Search Comments
        • Update Comment Attributes
        • Delete Comment Attributes
        • Update Comment Flags
        • Delete Comment Flag
        • Get Comment Flags
        • Moderate Comment
        • Get Comments By Moderation Status
        • Count Comments By Moderation Status
        • Get Flagged Comments
        • Count Flagged Comments
        • Get Attachments
        • Get Attachment Content
        • Create Attachment
        • Delete Attachment
        • Update Attachment Content
        • Vote Up
        • Vote Down
        • Remove Votes
        • Get Thread Comments
        • Get Comment Children
        • Subscribe
        • Update Subscription
        • Unsubscribe
        • Get Memory Stats
        • Get Status
        • Get Version
    • Cookbooks / Tutorials
      • Querying Content
        • Basic Query Mechanics
      • Solutions: Active Cache
        • Active Cache a RESTful Response
      • Solutions for Activiti
        • Start an Activiti Process via Rest Script
      • Solutions for AWS
        • Use S3 to store assets
        • Upload and Transcode Video using AWS Elemental MediaConvert
      • Solutions for Box
        • Use Box to store assets
      • Solutions RESTful Services
        • Render Page Components as JSON
        • Get the Names of Sites Running in Crafter Engine
        • Get Pages for a Given Site
      • GraphQL
        • Working with GraphQL
        • Custom GraphQL Schema
      • Best Practices
        • Best Practices on Loading Content From Disk vs Search Index
        • Environment Specific Configurations
      • How-Tos
        • Changing the Data and Logs Folder Location
        • Configuring Crafter on Docker for Local Development Tools
        • Integrating CrafterCMS with cloud hosted developer platforms
          • Integrating CrafterCMS with BitBucket
          • Integrating CrafterCMS with GitHub
          • Integrating CrafterCMS with GitLab
        • Overriding Logging Levels
        • Setting up an LDAP server for development/testing using Apache Directory Studio
        • Using Custom Processors with Crafter Deployer
        • Web Manifest Usage in CrafterCMS
        • Working with Crafter Studio’s APIs
        • Working with Dates and Time Zones in Freemarker
        • Working with Dates and Time Zones in Groovy
        • Working With URL Interceptor/Servlet Filters in CrafterCMS
        • Working with Sass in CrafterCMS
        • Migrating a site from Solr to Elasticsearch
        • Migrating a site from the previous Elasticsearch client
      • RTE How-tos
        • Inserting Links to Pages in the Rich Text Editor (RTE)
  • Site Administrators
    • Navigating Project Tools
    • Configuration
      • Studio Configuration
        • Asset Processing Configuration
        • AWS Profiles Configuration
        • Blob Stores Configuration
        • Box Profiles Configuration
        • Configurations
        • Content Monitoring
        • Content Type Editor Config
        • Dependency Resolver Configuration
        • Configure Simple Workflow Notifications and Dialog Messages
        • Permission Mappings
        • Project Configuration
        • Project Policy Configuration
        • Role Mappings
        • User Interface Configuration
        • WebDAV Profiles Configuration
        • Multi-Environment Configuration
        • Publishing Assets in External Storage
      • Engine Configuration
        • Engine Project Configuration
        • Engine Project Security Guide
        • Engine SAML2 Configuration
        • Engine Headers Based Authentication
        • Engine Crafter Profile Configuration
        • Content Targeting Guide
        • Configure Engine to use MongoDB
        • Configuring URL Rewriting
        • Engine Multi-Environment Configuration
        • Engine Multi-Target Configuration
        • Proxy Configuration
    • Viewing Logs Through Crafter Studio
  • System Administrators
    • Installing
      • Requirements and Supported Platforms
      • Setting up a CrafterCMS production environment
      • Setup CrafterCMS Authoring Using Crafter’s AWS AMI
      • Setup CrafterCMS Delivery Using Crafter’s AWS AMI
    • Backup and Recovery
    • Studio Clustering
      • Setup a Two Node Cluster with Studio
      • Setup Studio Clustering with Kubernetes Deployment
      • Changing the Cluster Git URL
      • Authoring-Cluster Troubleshooting
    • DevContentOps Toolkit
      • Crafter CLI Commands
        • add-environment
        • add-remote
        • copy-plugin
        • create-site
        • list-remotes
        • list-sites
        • sync-from
        • sync-to
    • Logging
    • Setting up a CrafterCMS production environment
    • Reindexing Content for Search and Queries
    • Reindexing Content Without Disrupting Service in Production
    • Reverse Proxy Configuration
    • Troubleshooting CrafterCMS
      • Debugging Search Issues
      • Debugging Publishing Issues
      • Debugging Deployer Issues
      • Debugging SSH Key Issues
      • Debugging SSL Handshake Issues
    • Randomize “admin” Password for CrafterCMS Fresh Install
    • Configuring Studio Security
      • Studio SAML2 Configuration
      • Configure LDAP Authentication
      • Configure Header-Based Authentication
    • Configure SSL/TLS
    • Setup CloudFront Signed Cookies in CrafterCMS
    • Deploying CrafterCMS in Kubernetes
      • Simple Authoring With a Single Instance Kubernetes Deployment
      • Setup Studio Clustering with Kubernetes Deployment
      • Simple Delivery Kubernetes Deployment
    • Adding a New Language
    • Encrypting Configuration Properties
    • Management Tokens
    • Upgrading CrafterCMS
      • Upgrading CrafterCMS
      • Docker/Kuber Instructions for Upgrading CrafterCMS
      • Upgrading MongoDB
    • Authoring Environment Performance Tuning
    • How To Change the Hosts and Ports on Your CrafterCMS Authoring Environment Installation
    • Configuring Publishing to Staging Target
    • Setup CrafterCMS Authoring Using Crafter’s AWS AMI
    • Synchronize Studio Database With Repository
    • Navigating the Navigation Menu
      • Duplicating a Project
    • Users/Groups Management
      • Users Management
      • Groups Management
      • Roles and Permissions
      • Putting it all together - Users, Groups, Roles and Permissions
      • User passwords
    • How To Change the Hosts and Ports on Your CrafterCMS Delivery Environment Installation
    • Delivery Environment Performance Tuning
    • Setup Project for a Delivery Environment
    • Setup Serverless Delivery
    • Setup CrafterCMS Delivery Using Crafter’s AWS AMI
    • Using the Encryption Tool
    • Deployer System Administration Guide
    • Deployer Processors Guide
    • Target Templates Guide
    • Debugging Deployer Issues
    • Elasticsearch Configuration Guide
    • Configure Multi-Tenancy in Engine
    • Configure Single-Tenancy in Engine
    • Turn Off Show Error
    • Engine’s Configuration Overrides
    • Crafter Profile System Administration
    • Crafter Profile Admin Console UI
      • Accessing the Admin Console
      • Access Tokens Management
      • Tenants Management
      • Profiles Management
    • Crafter Social System Administration
    • Crafter Social Admin Console UI
      • Accessing the Admin Console
      • Social Contexts Management
      • Security Actions Management
      • Preferences Management
      • Profiles Management
      • User Generated Content Moderation
    • Studio Configuration Files
    • Debugging Publishing Issues
    • Debugging Upgrade Issues
    • Project Creation with Remote Repositories
    • Changing the Session Timeout
    • Publishing Blacklist
  • Security
    • Security Policies
    • Security Advisories
    • Security Processes
  • Release Notes
  • Roadmap
  • Contribute
    • Documentation Standard
  • Source Code
  • Support
  • FAQ
  • Acknowledgements
  • »
  • Developers »
  • Cookbooks / Tutorials »
  • RTE How-tos »
  • Inserting Links to Pages in the Rich Text Editor (RTE)

  • Document Up to Date
  • Updated For 4.0.0
Back to top
Edit this page

Inserting Links to Pages in the Rich Text Editor (RTE)

Users sometimes need to link to a page in the site to selected text in their document. This section details how to setup the Rich Text Editor (RTE) to allow a user to browse or search for pages and insert links to them.

Basic Setup and Configuration

  1. Open the content type with the Rich Text Editor (RTE) to be setup. Open the Sidebar and click on projectTools and select Content Types. Select the content type with the RTE you’d like to setup, then click on the Open Type button.

  2. Setup the data source to select a page from the site. From the content model definition, go to the Data Sources panel and drag File Browse to the the Data Sources section of the form and fill in the following properties:

    • Title : Data source title to show on the form e.g. Pages

    • Name : Name of variable to store the final result in e.g. pages

    • Repository Path : Path where to browse the pages from e.g. /site/website

  3. Bind the data source setup above to the RTE. From the content model definition, click on the RTE you want to be able to browse or search for pages and insert links to them. Next, go to the Properties Explorer panel and scroll to the File Manager property. Put a check mark on the box next to the data source previously setup to bind it to the RTE.

  4. Click on the Save button to save your changes. The RTE is now setup to allow a user to browse or search for pages and insert links to them.

Example

Let’s take a look at an example using a site created using the Website Editorial blueprint. We will setup the RTE in the Page - Article content type to allow a user to browse or search for pages and insert links to them. We will first setup the RTE, then see it in action.

  1. Open the content type with the Rich Text Editor (RTE) to be setup. Open the Sidebar and click on projectTools and select Content Types. Click on Open Existing Type, and select the content type Page - Article then click on the Open Type button.

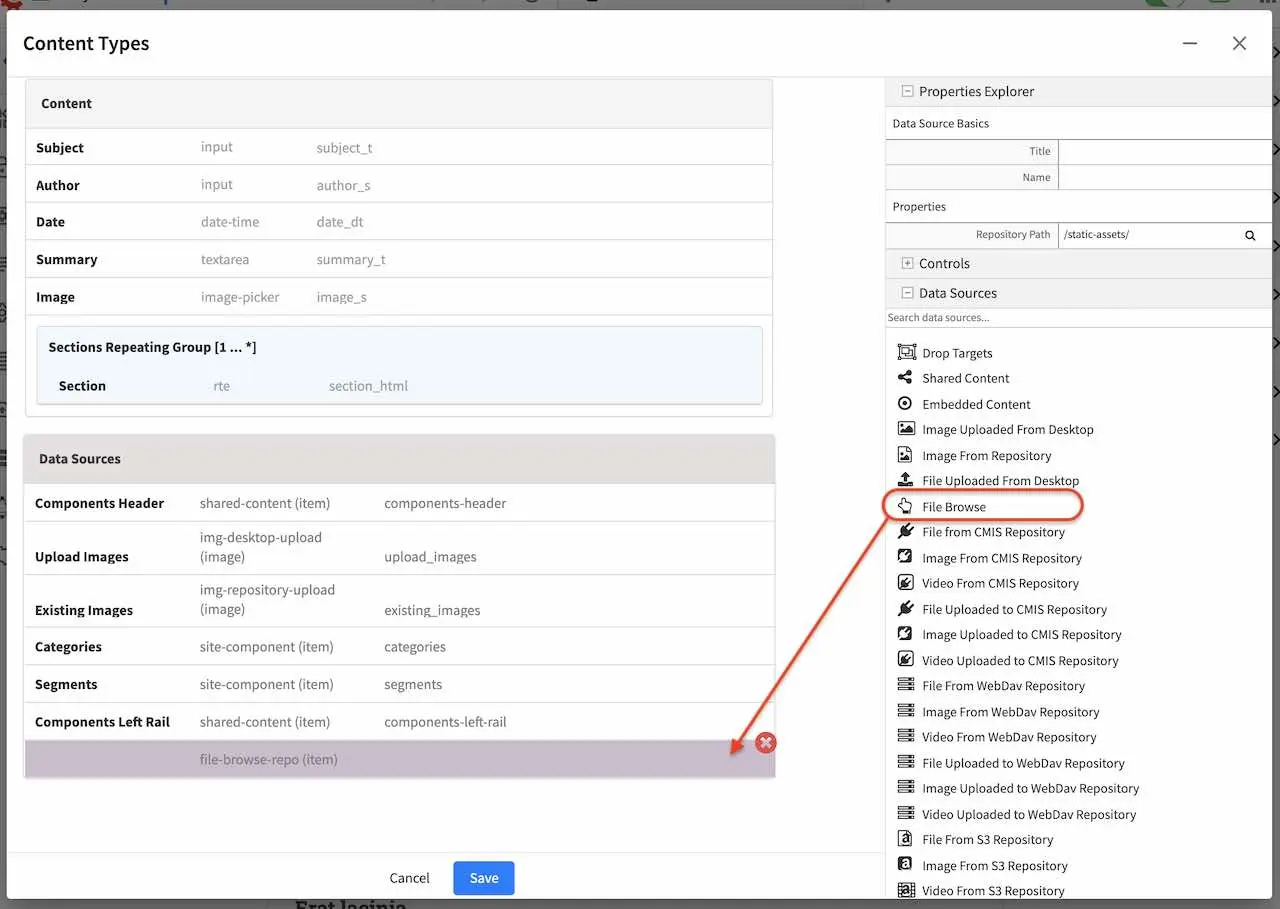
  2. Setup the data source to select a page from the site. From the content model definition, go to the Data Sources panel and drag File Browse to the the Data Sources section of the form.

    Allow user to browse pages and insert link - add "File Browse" data source

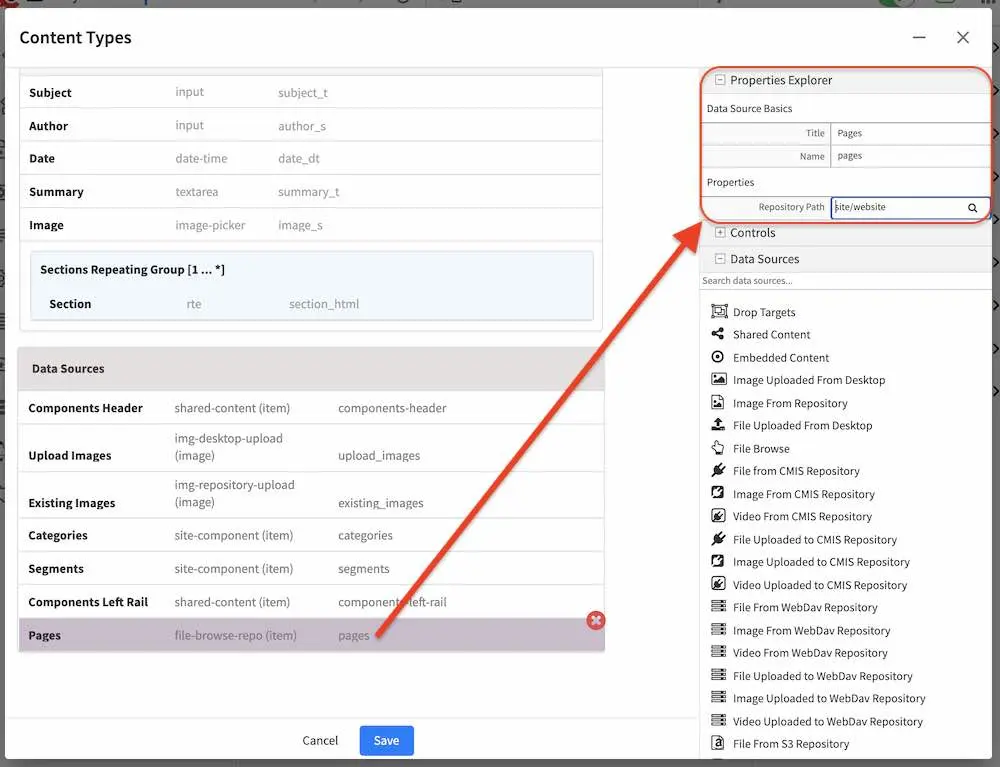
    Fill in the following properties:

    • Title : Pages

    • Name : pages

    • Repository Path : /site/website

    Allow user to browse pages and insert link - data source setup

  3. Bind the data source setup above to the RTE. From the content model definition, click on the RTE Section. Next, go to the Properties Explorer panel and scroll to the File Manager property. Put a check mark on the box next to Pages, the data source previously setup, to bind it to the RTE.
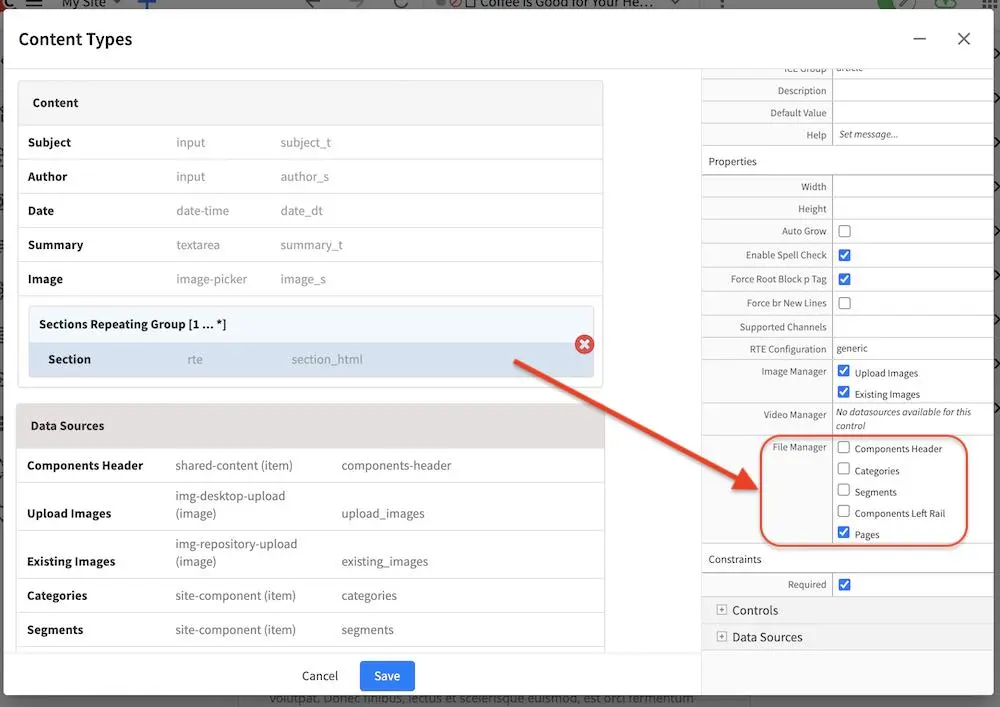
    Allow user to browse pages and insert link - bind the data source to RTE

  4. Click on the Save button.

Let’s now take a look at the data source we setup and bound to the RTE in action.

  1. Preview the article Coffee is Good for Your Health by either opening the Sidebar and navigating to /articles/2016/6/coffee-is-good-for-your-health or, from the Home page, click on the Health category, then click on Coffee is Good for Your Health

  2. Edit the article, then scroll down to the Section

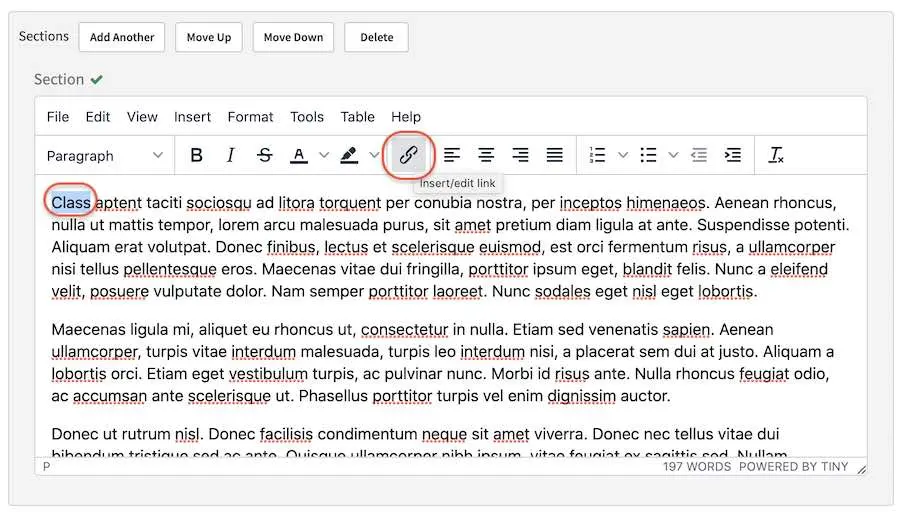
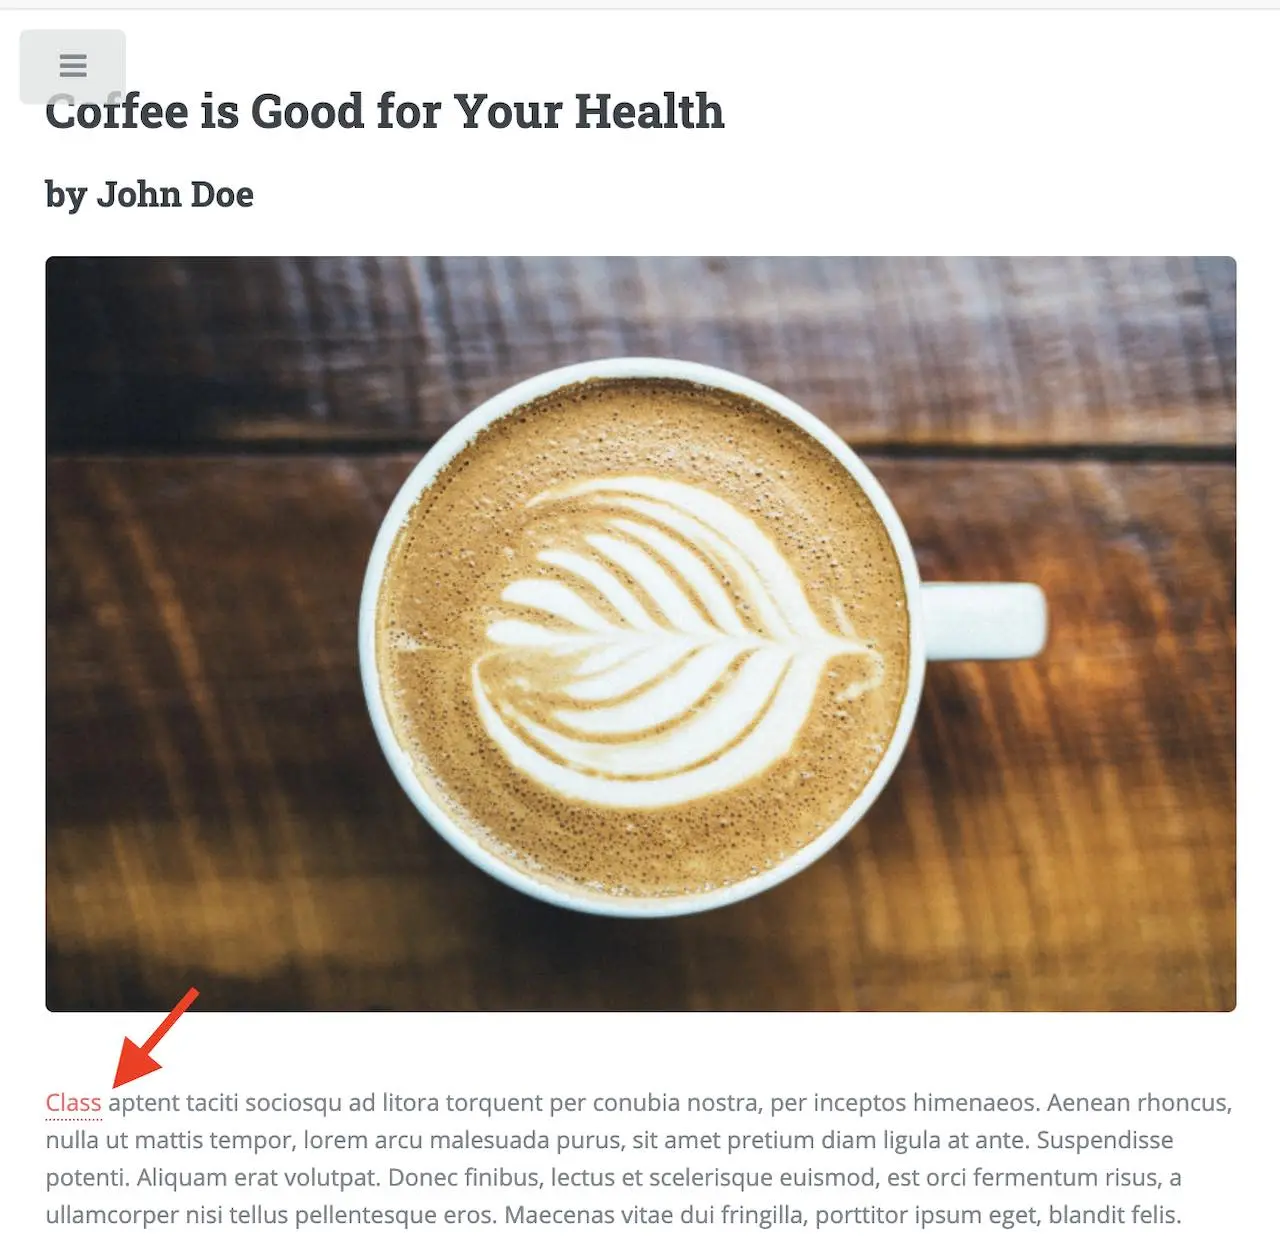
  3. Select a word in the RTE. For our example, let’s highlight the first word, Class, then click on Insert/edit link from the toolbar

    Allow user to browse pages and insert link - select "Class" then click on "Insert/edit link"

  4. Click on the button next to URL then select Pages. This is the data source we setup.
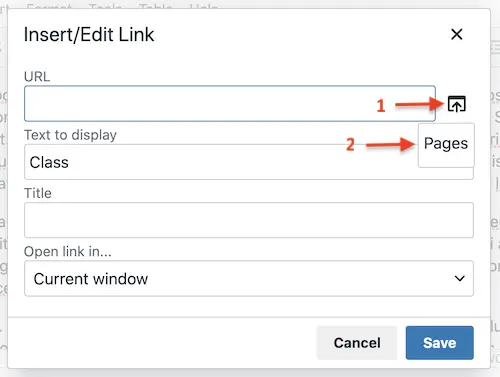
    Allow user to browse pages and insert link - Click on button next to "URL" then click on "Pages"

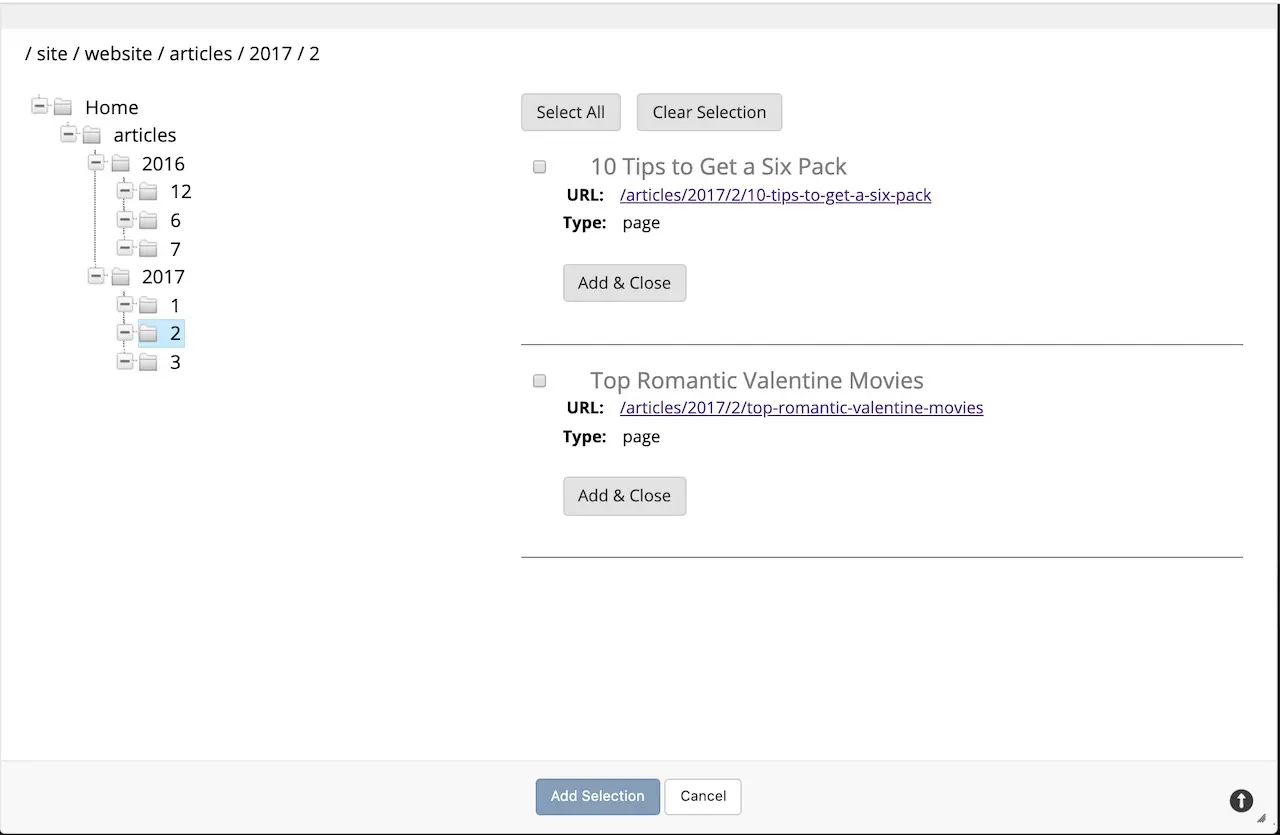
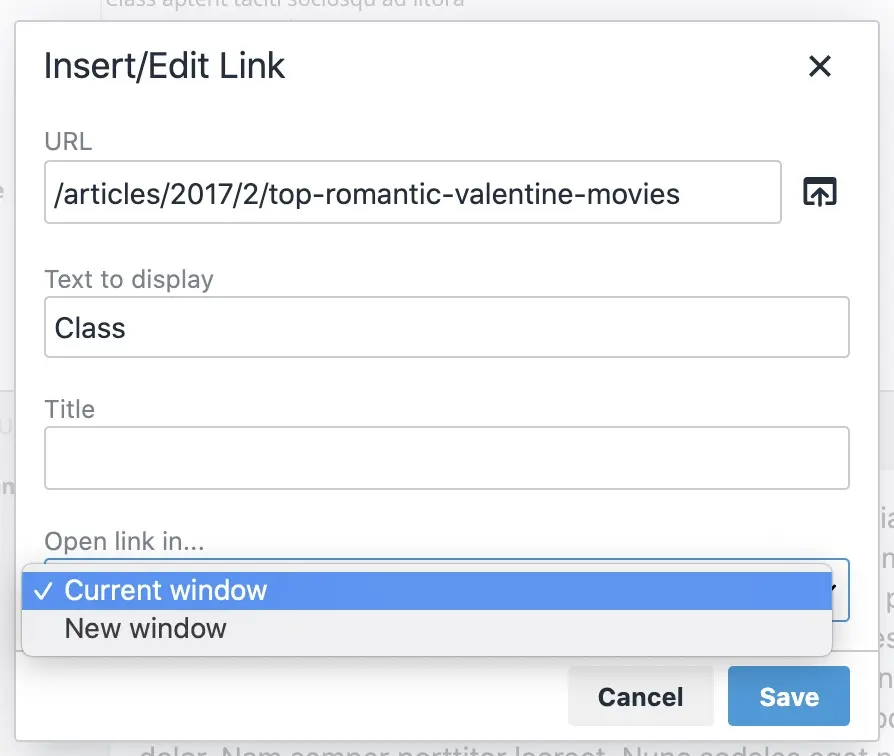
  5. Select a page to link to. We will link the page /article/2017/2/top-romantic-valentine-movies to the selected text in our RTE

    Allow user to browse pages and insert link - Click on button next to "URL" then click on "Pages"

  6. Save the link.

    Allow user to browse pages and insert link - Save the link"

  7. The link is now setup.

    Allow user to browse pages and insert link - Link created on word "Class" in RTE"

Next
Site Administrators
Previous
RTE How-tos
Copyright © 2025, Crafter Software Corporation
Made with Sphinx and @pradyunsg's Furo
On this page
  • Inserting Links to Pages in the Rich Text Editor (RTE)
    • Basic Setup and Configuration
    • Example