Setup a Serverless Site
Warning
This document has been deprecated and is provided as a reference only. Please see Setup Serverless Delivery for the updated version.
CrafterCMS can be configured to serve sites directly from AWS services, following this guide you will:
Configure the Crafter Deployer of an authoring environment to upload files to AWS S3 and index to AWS Elasticsearch.
Configure the Crafter Engine of a delivery environment to read files from AWS S3 and query to AWS Elasticsearch.
Prerequisites
An AWS account
A CrafterCMS authoring environment
A CrafterCMS delivery environment
Step 2: Create the AWS resources
Important
You might need to wait several minutes before the CloudFront distribution and the Elasticsearch domain are available to continue with the next steps.
Important
If you already have a serverless site set up, and are in the process of setting up another one, you can reuse the S3 Bucket and Elasticsearch. You will need to create a new CloudFront distribution though, since each site needs its own distribution.
Login to the AWS Management Console to create the following resources:
S3 Bucket
In the top navigation bar click the
Servicesdropdown menu, and search forS3.Click on
Create bucket.Enter the
Bucket name(for example,craftercms-sites), choose the region, leave the defaults on the next 2 steps and finally click onCreate.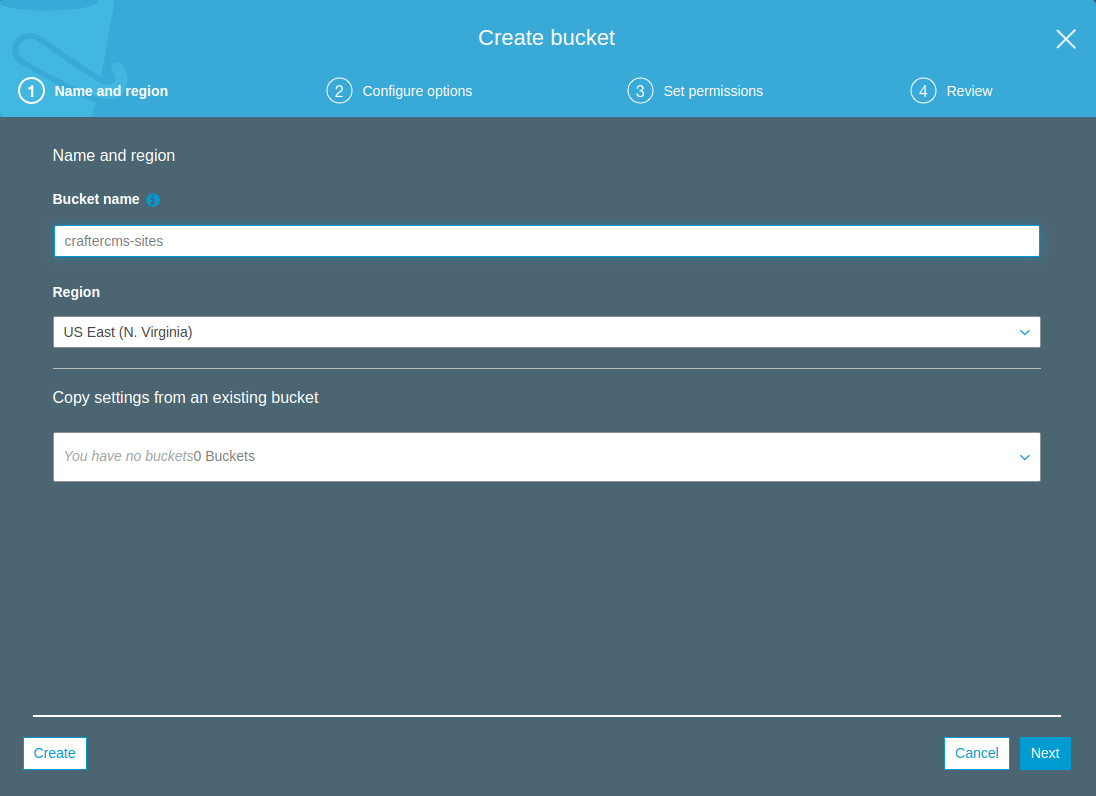
After the bucket is created, select the bucket, go to
Permissionsand in theCORS Configurationenter the following:<?xml version="1.0" encoding="UTF-8"?> <CORSConfiguration xmlns="http://s3.amazonaws.com/doc/2006-03-01/"> <CORSRule> <AllowedOrigin>*</AllowedOrigin> <AllowedMethod>GET</AllowedMethod> <AllowedMethod>HEAD</AllowedMethod> <MaxAgeSeconds>3000</MaxAgeSeconds> <AllowedHeader>*</AllowedHeader> </CORSRule> </CORSConfiguration>
Important
For production and to tighten up security, we recommend you specify a fixed origin in
AllowedOrigin.
Elasticsearch
In the top navigation bar click the
Servicesdropdown menu, and search forElasticsearch Service.Click on
Create a new domain.Select a
Deployment Typeand on the Elasticsearch version, pick the latest6.x(currently it’s6.5).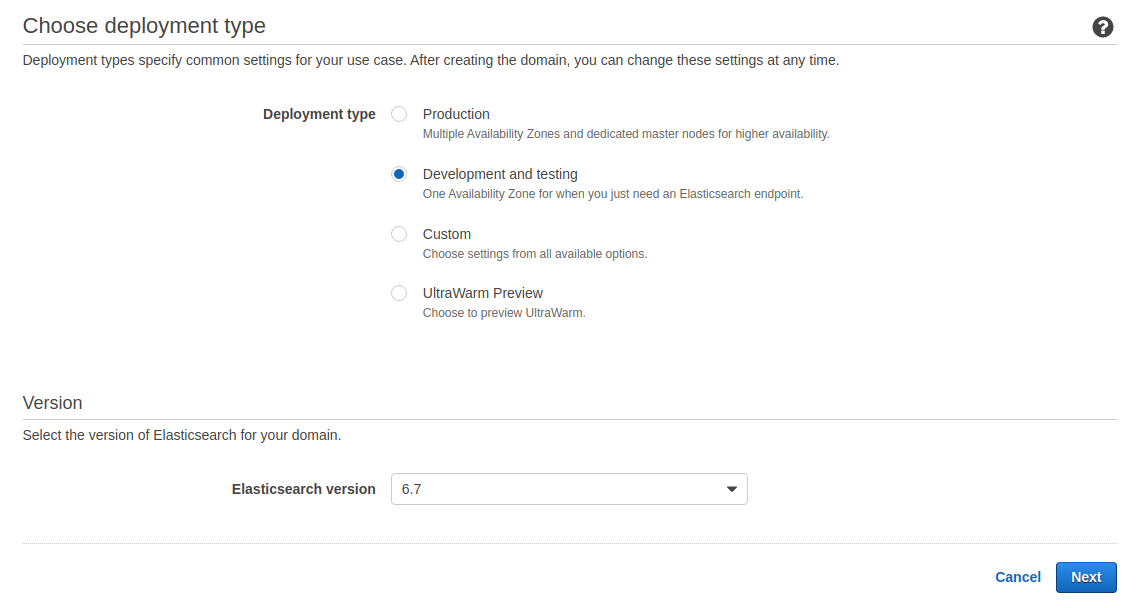
On the next screen, enter the domain name. Leave the defaults on the rest of the settings or change as needed, and then click on
Next.On
Network Configuration, we recommend you pick the VPC where your authoring and delivery nodes reside. If they’re not running on an Amazon VPC, then pickPublic Access.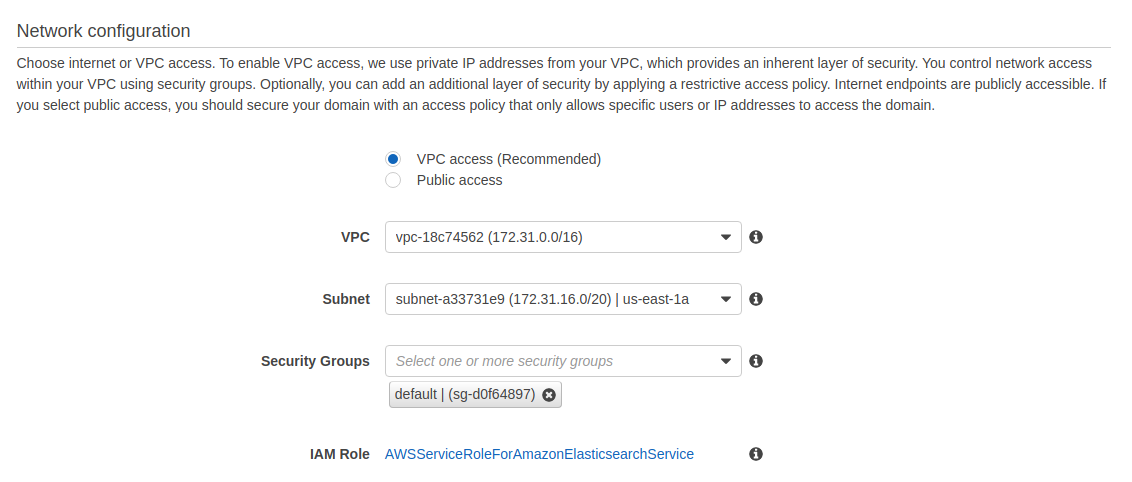
Select the
Access Policythat fits your Crafter environment, and click onNext.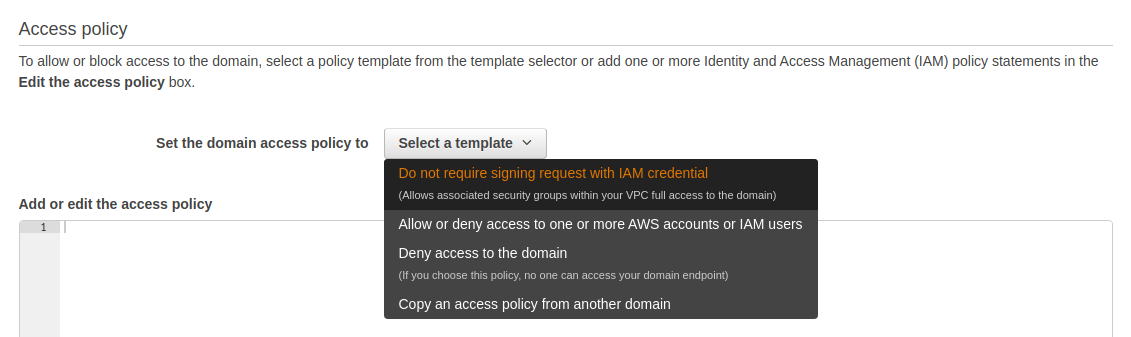
Review the settings and click on
Confirm.Wait for a few minutes until the domain is ready. Copy the
Endpoint. You’ll need this URL later to configure the Deployer and Delivery Engine which will need access to the Elasticsearch.
CloudFront Distribution
In the top navigation bar click the
Servicesdropdown menu, and search forCloudFront.Click on
Create Distribution.In
Select a delivery method for your content, click onGet StartedunderWeb.
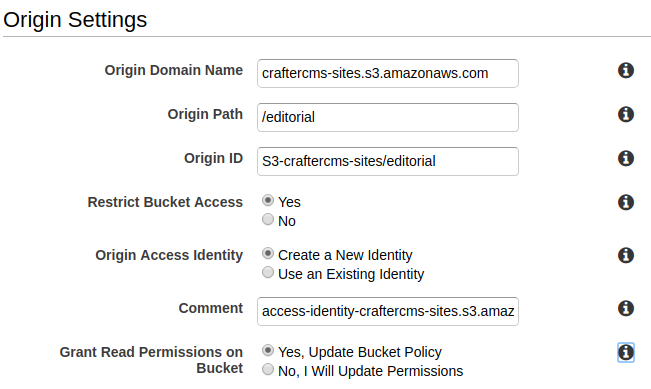
In the
Origin Settingssection do the following:In
Origin Domain Name, select the S3 bucket domain.In
Origin Path, enter the site base path (e.g./editorial)Select
YesinRestrict Bucket Access.Select
Create a New IdentityinOrigin Access Identity.Select
Yes, Update Bucket PolicyinGrant Read Permissions on Bucket.
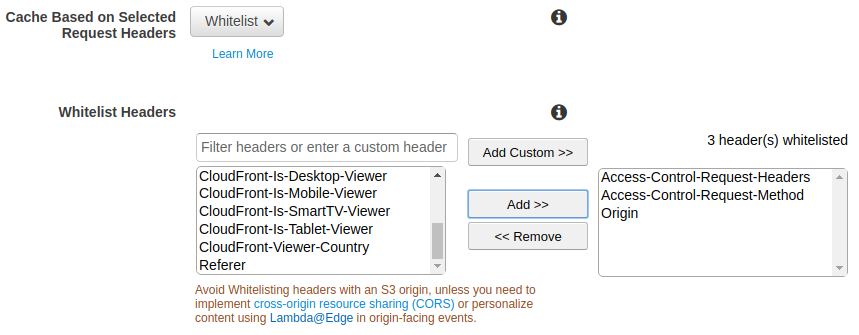
Under the
Default Cache Behavior Settingssection, inCache Based on Selected Request Headers, selectWhitelistand add the following headers:Access-Control-Request-Headers,Access-Control-Request-MethodandOrigin.
Leave or change the rest of the settings as you see fit, and finally click on
Create Distribution.On the left sidebar, click on
Distributions. You should see the distribution been created (In Progressstatus). Take note of the distributionIDandDomain Namefor the next steps.
Step 3: Configure the Delivery Crafter Engine for Serverless Mode
Edit the services override file to enable the Serverless S3 mode (
DELIVERY_INSTALL_DIR/bin/apache-tomcat/shared/classes/crafter/engine/extension/services-context.xml):<?xml version="1.0" encoding="UTF-8"?> <beans xmlns="http://www.springframework.org/schema/beans" xmlns:xsi="http://www.w3.org/2001/XMLSchema-instance" xsi:schemaLocation="http://www.springframework.org/schema/beans http://www.springframework.org/schema/beans/spring-beans.xsd"> <import resource="classpath*:crafter/engine/mode/multi-tenant/simple/services-context.xml" /> <!-- S3 Serverless Mode --> <import resource="classpath*:crafter/engine/mode/serverless/s3/services-context.xml" /> </beans>
Edit the properties override file to point the content store to the AWS services (
DELIVERY_INSTALL_DIR/bin/apache-tomcat/shared/classes/crafter/engine/extension/server-config.properties). The properties you need to update are the following:crafter.engine.site.default.rootFolder.pathcrafter.engine.s3.regioncrafter.engine.s3.accessKeycrafter.engine.s3.secretKey
An example of how the server-config.properties would look with these properties configured (values in
*are not displayed since they’re sensitive):DELIVERY_INSTALL_DIR/bin/apache-tomcat/shared/classes/crafter/engine/extension/server-config.properties¶# Content root folder when using S3 store. Format is s3://<BUCKET_NAME>/<SITES_ROOT>/{siteName} crafter.engine.site.default.rootFolder.path=s3://craftercms-sites/{siteName} # The URL of Crafter Search crafter.engine.search.server.url=${SEARCH_URL} # The URL of Crafter Profile crafter.profile.rest.client.url.base=${PROFILE_URL} # If the Security Provider is enabled crafter.security.enabled=true # The Elasticsearch hosts to use crafter.engine.elasticsearch.urls=${ES_URL} # S3 Serverless properties # S3 region crafter.engine.s3.region=us-east-1 # AWS access key crafter.engine.s3.accessKey=********** # AWS secret key crafter.engine.s3.secretKey=********************
You can also provide the AWS region, access key and secret key without having to edit the config file properties. Please see Set up AWS Credentials and Region for Development.
Edit the
ES_URLinDELIVERY_INSTALL_DIR/bin/crafter-setenv.shto point to the Elasticsearch endpoint:export ES_URL=https://search-craftercms-sites-kvbatu2vr4nioxpwmktlpvq3jm.us-east-1.es.amazonaws.com
Step 4: Test the Delivery Site
Start the delivery environment:
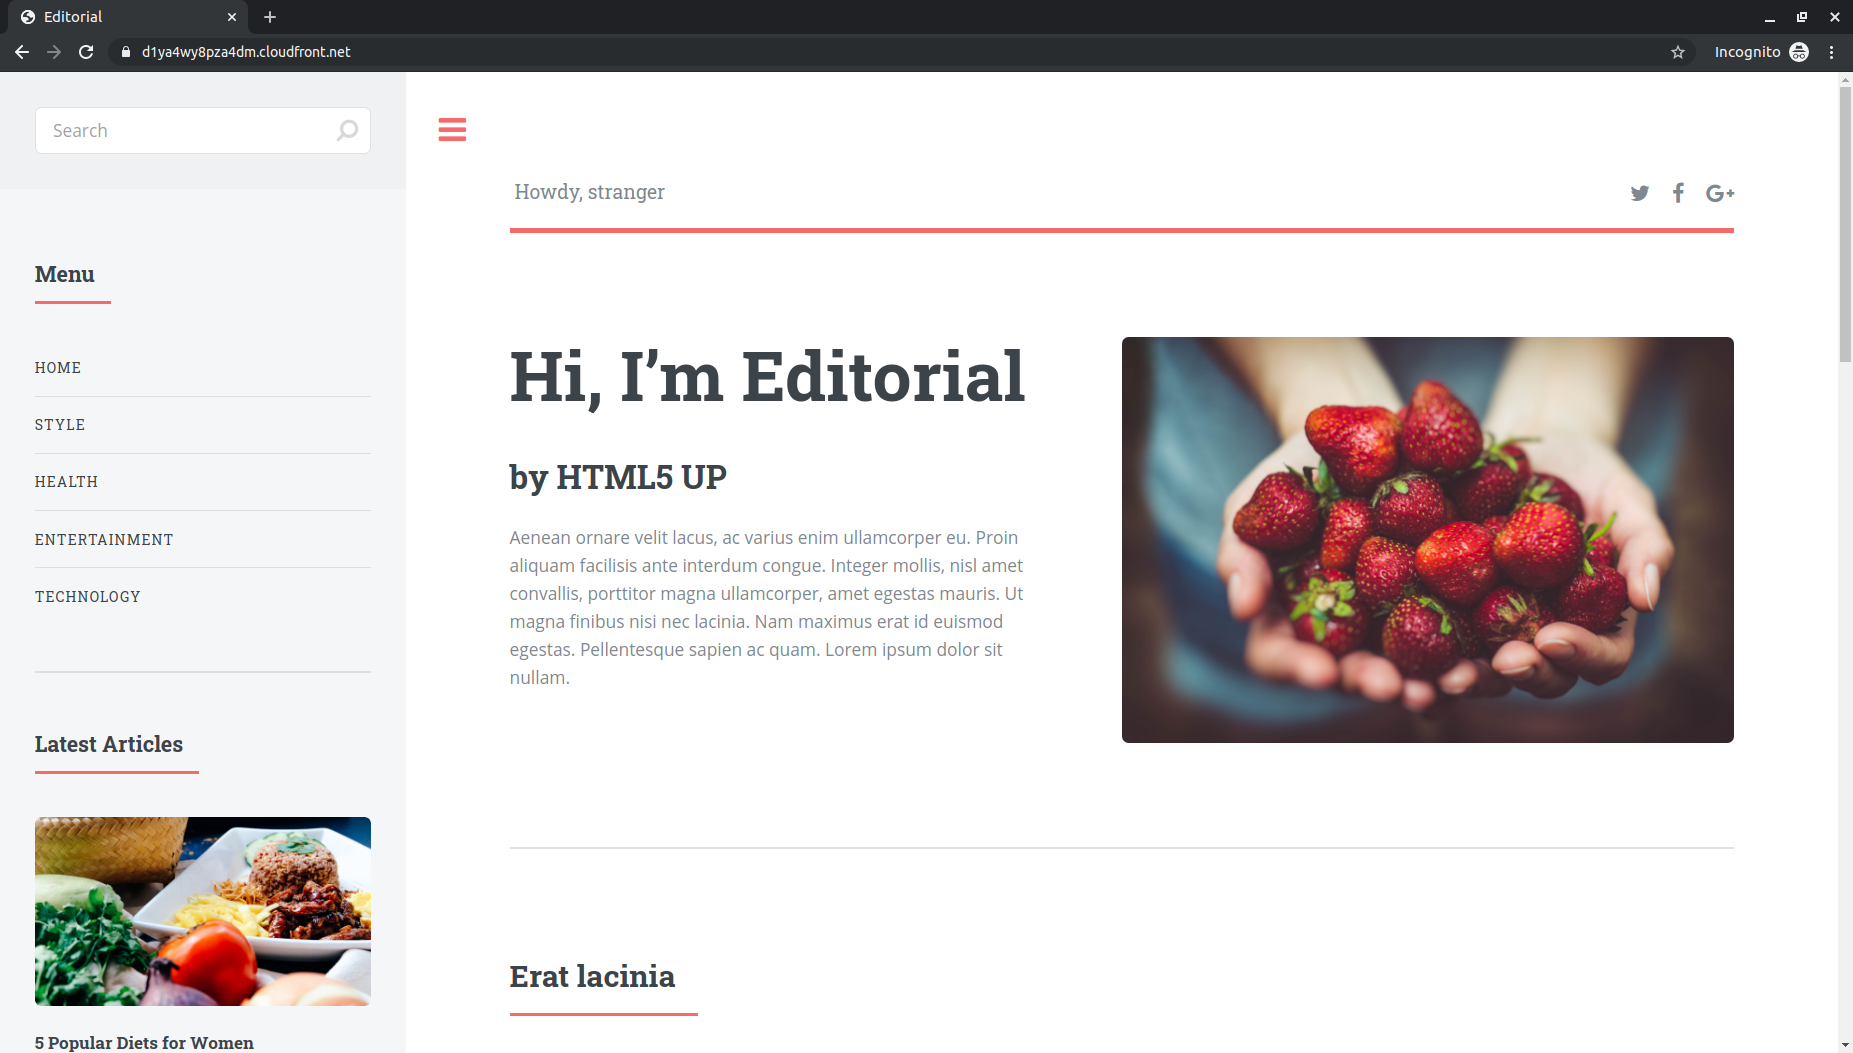
DELIVERY_INSTALL_DIR/bin/startup.shOpen a browser and go to http://localhost:9080?crafterSite=editorial.
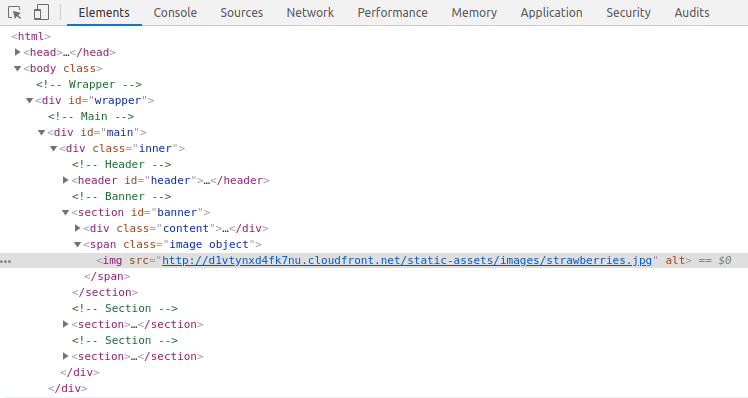
- Verify that the static-assets are being served from the CloudFront distribution (in Chrome, you can do this by
right-clicking an image and then clicking on
Inspect).