
Performance and Scaling
Thanks to its architecture, CrafterCMS can be scaled to accommodate any size traffic load. CrafterCMS can also be geographically distributed allowing for local delivery of personalized content.
Here are things to consider for your CrafterCMS install to optimize the overall performance of your sites.
Delivery
CrafterCMS’s delivery tier is designed to be perfectly horizontally scalable. The delivery tier is a shared-nothing architecture, meaning that each node in the delivery tier is independent of the other nodes. This allows for the delivery tier to be scaled horizontally by simply adding more nodes to the delivery tier. The delivery tier can also be scaled vertically by adding more resources.
Therefore, there is never a need to build traditional clusters for the delivery tier.
Global distribution of delivery nodes is then a matter of deploying Crafter Engine nodes in different regions, and using a DNS service to route traffic to the region closest to the user. Crafter Deployer is capable of deploying content to multiple regions, and enabling region specific search engines to be used as well to completely decentralize the delivery tier.
Finally, a Content Delivery Network (CDN) can be used to front the delivery tier. CDNs mostly help with static content delivery, and mitigation of DDOS attacks.
Note
Crafter Engine’s cache headers can help provide the right caching behavior for CDNs. See Setting Cache Headers for more.
It’s critical to performance tune CrafterCMS for real production. This section describes ways on how to enhance a traditional delivery environment setup (non-serverless) performance by tuning delivery environment settings and recommendations for hardware configurations.
Server Requirements
Minimum Installation
8GB of RAM + 8GB Swap Space or Virtual Memory
4GB JVM Memory (-Xms 1G -Xmx 4G)
4 CPU Cores
Medium Installations
16GB+ of RAM + 16GB Swap Space or Virtual Memory
8GB+ JVM Memory (-Xms 2G -Xmx 8G)
8+ CPU Cores
Large Installations
32GB+ of RAM + 16GB Swap Space or Virtual Memory
16GB+ of JVM Memory (-Xms 4G -Xmx 16G)
16+ CPU Cores
Horizontal scaling can be very effective in scaling out delivery of content.
Engine Performance Tuning
JVM Level
To configure the heap size, etc for the JVM, open CRAFTER_HOME/bin/crafter-setenv.sh and update the environment
variable CATALINA_OPTS to desired value like below:
export CATALINA_OPTS=${CATALINA_OPTS:="-server -Xss1024K -Xms1G -Xmx2G -Dlog4j2.formatMsgNoLookups=true"}
Authoring
The authoring tier is used by the few to create and workflow content to be consumed by the many. Therefore, the content authoring tier scales vertically (by adding more resources to the authoring node), can be sharded (more nodes added to serve different projects), and clustered for high-availability.
The authoring tier must be tuned carefully to get the most out of the infrastructure and for Crafter Studio to perform well. This section describes ways on how to enhance the authoring environment performance by tuning authoring environment settings and recommendations for hardware configurations.
Studio Performance Tuning
JVM Level
To configure the heap size, etc for the JVM, open CRAFTER_HOME/bin/crafter-setenv.sh and update the environment
variable CATALINA_OPTS to desired value like below:
export CATALINA_OPTS=${CATALINA_OPTS:="-server -Xss1024K -Xms1G -Xmx4G -Dlog4j2.formatMsgNoLookups=true"}
Crafter Studio Application Level
DB Connection Pool
To configure the DB connection pool, override the properties listed below as needed in the studio-config-override.yaml file in the CRAFTER_HOME/bin/apache-tomcat/shared/classes/crafter/studio/extension/ folder, or via the Global Config in the Studio  Navigation Menu:
# Defines initial number of database connections in database connection pool
studio.db.pool.initialConnections: 10
# Defines maximum number of active database connections in database connection pool
studio.db.pool.maxActiveConnections: 100
# Defines maximum number of idle database connections to retain in database connection pool.
studio.db.pool.maxIdleConnections: 30
# Defines minimum number of idle database connections to retain in database connection pool.
studio.db.pool.minIdleConnections: 10
High-level Performance Considerations
The majority of CrafterCMS operations are I/O intensive. Optimizing your installation for better I/O performance will typically pay the biggest dividends in performance gains early on. These general guidelines help address these considerations:
Fast raw storage performance (fast concurrent reads and writes)
Different storage devices are used for different concerns (logging, Git, search index, swap etc.)
Data organization on disk (using different devices for each repos, indexes, etc)
Leave half the RAM for the OS and non-JVM processes
Server Performance Tuning
Server/Hardware Level
Disk/Storage Devices
Crafter Studio’s job is to manage content. A high volume of concurrent reads and writes should be expected. The faster the disk type and connection to the computer, the better the performance you will observe.
Testing Raw Performance
Non-concurrent quick test or the raw device performance can be achieved with
sudo hdparm -tT /dev/{device}Example
1Timing cached reads:   24486 MB in  1.99 seconds = 12284.28 MB/sec
2Timing buffered disk reads: 3104 MB in  3.00 seconds = 1033.84 MB/sec
Test IOPS using
fiohttps://github.com/axboe/fioExample
 1$ fio --randrepeat=1 --ioengine=libaio --gtod_reduce=1 --name=test --filename=test --bs=4k --iodepth=64 --size=4G --readwrite=randrw --rwmixread=75
 2    test: (g=0): rw=randrw, bs=4K-4K/4K-4K/4K-4K, ioengine=libaio, iodepth=64
 3    fio-2.2.10
 4    Starting 1 process
 5    Jobs: 1 (f=1): [m(1)] [100.0% done] [495.2MB/164.7MB/0KB /s] [127K/42.2K/0 iops] [eta 00m:00s]
 6    test: (groupid=0, jobs=1): err= 0: pid=9071: Mon Apr 23 10:49:08 2018
 7        read : io=3071.7MB, bw=485624KB/s, iops=121406, runt=  6477msec
 8        write: io=1024.4MB, bw=161945KB/s, iops=40486, runt=  6477msec
 9        cpu          : usr=12.04%, sys=87.77%, ctx=32, majf=0, minf=8
10        IO depths    : 1=0.1%, 2=0.1%, 4=0.1%, 8=0.1%, 16=0.1%, 32=0.1%, >=64=100.0%
11submit    : 0=0.0%, 4=100.0%, 8=0.0%, 16=0.0%, 32=0.0%, 64=0.0%, >=64=0.0%
12complete  : 0=0.0%, 4=100.0%, 8=0.0%, 16=0.0%, 32=0.0%, 64=0.1%, >=64=0.0%
13issued    : total=r=786347/w=262229/d=0, short=r=0/w=0/d=0, drop=r=0/w=0/d=0
14latency   : target=0, window=0, percentile=100.00%, depth=64
15
16    Run status group 0 (all jobs):
17            READ: io=3071.7MB, aggrb=485624KB/s, minb=485624KB/s, maxb=485624KB/s, mint=6477msec, maxt=6477msec
18            WRITE: io=1024.4MB, aggrb=161944KB/s, minb=161944KB/s, maxb=161944KB/s, mint=6477msec, maxt=6477msec
Note
Notice the
IOPSfor READ and WRITETest latency with
iopinghttps://github.com/koct9i/iopingExample
 1    $ ioping -c 10 .
 2    4 KiB from . (ext4 /dev/nvme0n1p3): request=1 time=179 us
 3    4 KiB from . (ext4 /dev/nvme0n1p3): request=2 time=602 us
 4    4 KiB from . (ext4 /dev/nvme0n1p3): request=3 time=704 us
 5    4 KiB from . (ext4 /dev/nvme0n1p3): request=4 time=600 us
 6    4 KiB from . (ext4 /dev/nvme0n1p3): request=5 time=597 us
 7    4 KiB from . (ext4 /dev/nvme0n1p3): request=6 time=612 us
 8    4 KiB from . (ext4 /dev/nvme0n1p3): request=7 time=599 us
 9    4 KiB from . (ext4 /dev/nvme0n1p3): request=8 time=659 us
10    4 KiB from . (ext4 /dev/nvme0n1p3): request=9 time=652 us
11    4 KiB from . (ext4 /dev/nvme0n1p3): request=10 time=742 us
12
13    --- . (ext4 /dev/nvme0n1p3) ioping statistics ---
14    10 requests completed in 9.01 s, 1.68 k iops, 6.57 MiB/s
15    min/avg/max/mdev = 179 us / 594 us / 742 us / 146 us
Recommendations
Prefer multiple devices to a single device
Crafter must update content, metadata about the content, search indexes and more on every write. By storing each kind of data on its own storage device, you better enable these activities to occur concurrently and hence vastly improve performance.
Prefer faster disk
Not all storage devices are created equal. The fast the read/write speeds and the more concurrency and lower latency the device supports, the better the performance will be. As a general rule of thumb, use the highest IOPS devices for the most demanding storage concerns, by order of importance:
{CRAFTER_HOME}/data/repos (high-concurrency, important)
{CRAFTER_HOME}/data/db (high-concurrency, important)
{CRAFTER_HOME}/data/indexes
{CRAFTER_HOME}/data/logs
{CRAFTER_HOME}/data/mongodb (if in use)
Avoid high latency connections to disk
High latency connectivity such as Network-Attached Storage (NAS) will typically lead to performance problems. Local disk or Storage Array Network will yield much better performance. NFS or similar protocols will increase latency and cause performance issues.
Use a device for each storage concern when possible
One optimization to raise effective IOPS of a system without buying very expensive storage devices is to distribute the load across many devices. CrafterCMS performs multiple reads/writes to disk from various concerns such as the database, the repository, logs, etc. with very different I/O patterns. For optimal performance, the server should have different storage systems (disks) mounted for different concerns, for example:
/dev/{dev0} -> /
/dev/{dev1} -> /opt/crafter/data/db
/dev/{dev2} -> /opt/crafter/data/repos
/dev/{dev3} -> /opt/crafter/data/indexes
/dev/{dev4} -> /opt/crafter/logs
/dev/{dev5} -> /opt/crafter/data/mongodb
/dev/{dev6} -> /var
/dev/{dev7} -> /home
/dev/{dev8} -> /usr
OS Level
Linux Ulimit
CrafterCMS includes many subsystems that require additional file-handles be available at the operating system level.
Our limits are:
 1[Service]
 2# Other directives omitted
 3# (file size)
 4LimitFSIZE=infinity
 5# (cpu time)
 6LimitCPU=infinity
 7# (virtual memory size)
 8LimitAS=infinity
 9# (locked-in-memory size)
10LimitMEMLOCK=infinity
11# (open files)
12LimitNOFILE=65535
13# (processes/threads)
14LimitNPROC=65535
The values listed above can be persistently set in the limits.conf file located at
/etc/security/
Here’s an example of how the items listed above will look like in a limits.conf file:
/etc/security/limits.conf¶#[domain] [type] [item] [value] ... * - fsize infinity * - cpu infinity * - as infinity * - memlock infinity * - nofile 65535 * - nproc 65535 ...
- where
domain: can be a username, a group name, or a wildcard entry.
type: can be soft, hard or -
item: the resource to set the limit for
For more information on types, other items, etc. that you can configure, see your OS man page for limits.conf (e.g. man limits.conf or visit the online man page for your OS if available:: http://manpages.ubuntu.com/manpages/focal/en/man5/limits.conf.5.html )
Note
On RHEL/CentOS: For the
nprocsetting, please use/etc/security/limits.d/90-nproc.conf. More information can be found hereOn Ubuntu: The limits.conf file is ignored for processes started by init.d . To apply the settings in limits.conf for processes started by init.d, open
/etc/pam.d/suand uncomment the following:session required pam_limits.so
Tomcat Application Server Level
Connector Thread Count
Update the Tomcat Connector thread count to correlate to the number of CPU cores available on the server. This will ensure that the server is able to handle the maximum number of concurrent requests.
To configure the maximum number of active threads and minimum number of threads (idle and active) alive, open the
file CRAFTER_HOME/bin/apache-tomcat/conf/server.xml and set the following in the connector:
maxThreads=”<DESIRED_MAX_THREADS>”
minSpareThreads=”<DESIRED_MIN_SPARETHREADS>”>
In the configuration below, we set maxThreads to 600 and minSpareThreads to 100. For more information on Tomcat thread pools, see https://tomcat.apache.org/tomcat-9.0-doc/config/executor.html
<Connector port="${tomcat.http.port}" protocol="HTTP/1.1" URIEncoding="UTF-8"
           connectionTimeout="20000"
           redirectPort="${tomcat.https.port}"
           maxParameterCount="1000"
           maxThreads="600"
           minSpareThreads="100"
           />
Deployer Performance Tuning
Crafter Deployer is responsible for many operations including publishing content, updating search indexes, updating metadata about content and more. The faster the disk type, network connectivity, and available memory, the better the performance you will observe. For larger installations with a lot to index, the Deployer can run out of resources or be too slow for smooth operation of the system.
To configure the heap size, etc for the JVM, open CRAFTER_HOME/bin/crafter-setenv.sh and update the environment
variable DEPLOYER_JAVA_OPTS to desired value like below:
export DEPLOYER_JAVA_OPTS=${DEPLOYER_JAVA_OPTS:="-server -Xss1024K -Xmx1G -Dlog4j2.formatMsgNoLookups=true"}
Anti Patterns (Things NOT to do)
Here are some things we recommend NOT TO DO when setting up/configuring your authoring environment:
Slow Network Based Storage
Simple network storage such as NAS connected over copper network to compute is known to produce slow performance due to latency across many small operations. Avoid NAS storage.
Use of NFS as a Mounting Protocol
NFS is a particularly slow and unreliable network storage protocol, especially when mounts are configured with default settings.
Putting All Data on the Same Disk
Studio stores content in Git, Metadata about workflow and content in an embedded database and indexes in OpenSearch. All of these stores are updated on each write. Putting them on the same disk can lead to slower access times due to contention in high throughput scenarios.
Using Default Settings for Larger Installations
Installations are pre-configured with settings that assume an average/smaller sized machines. Further OS defaults are not managed by Crafter. To get the best performance you should consider and adjust for your specific environment, hardware, business needs and best practices.
Clustering  
If the authoring environment goes down, content management cannot happen. While that’s not going to stop the end-users from using the delivery tier and consuming content, it will stop the content authors from creating and managing content. Therefore, it’s often critical to cluster the authoring tier for high-availability.
In this section, we elaborate on how to cluster Crafter Studio and achieve high-availability in the authoring tier.
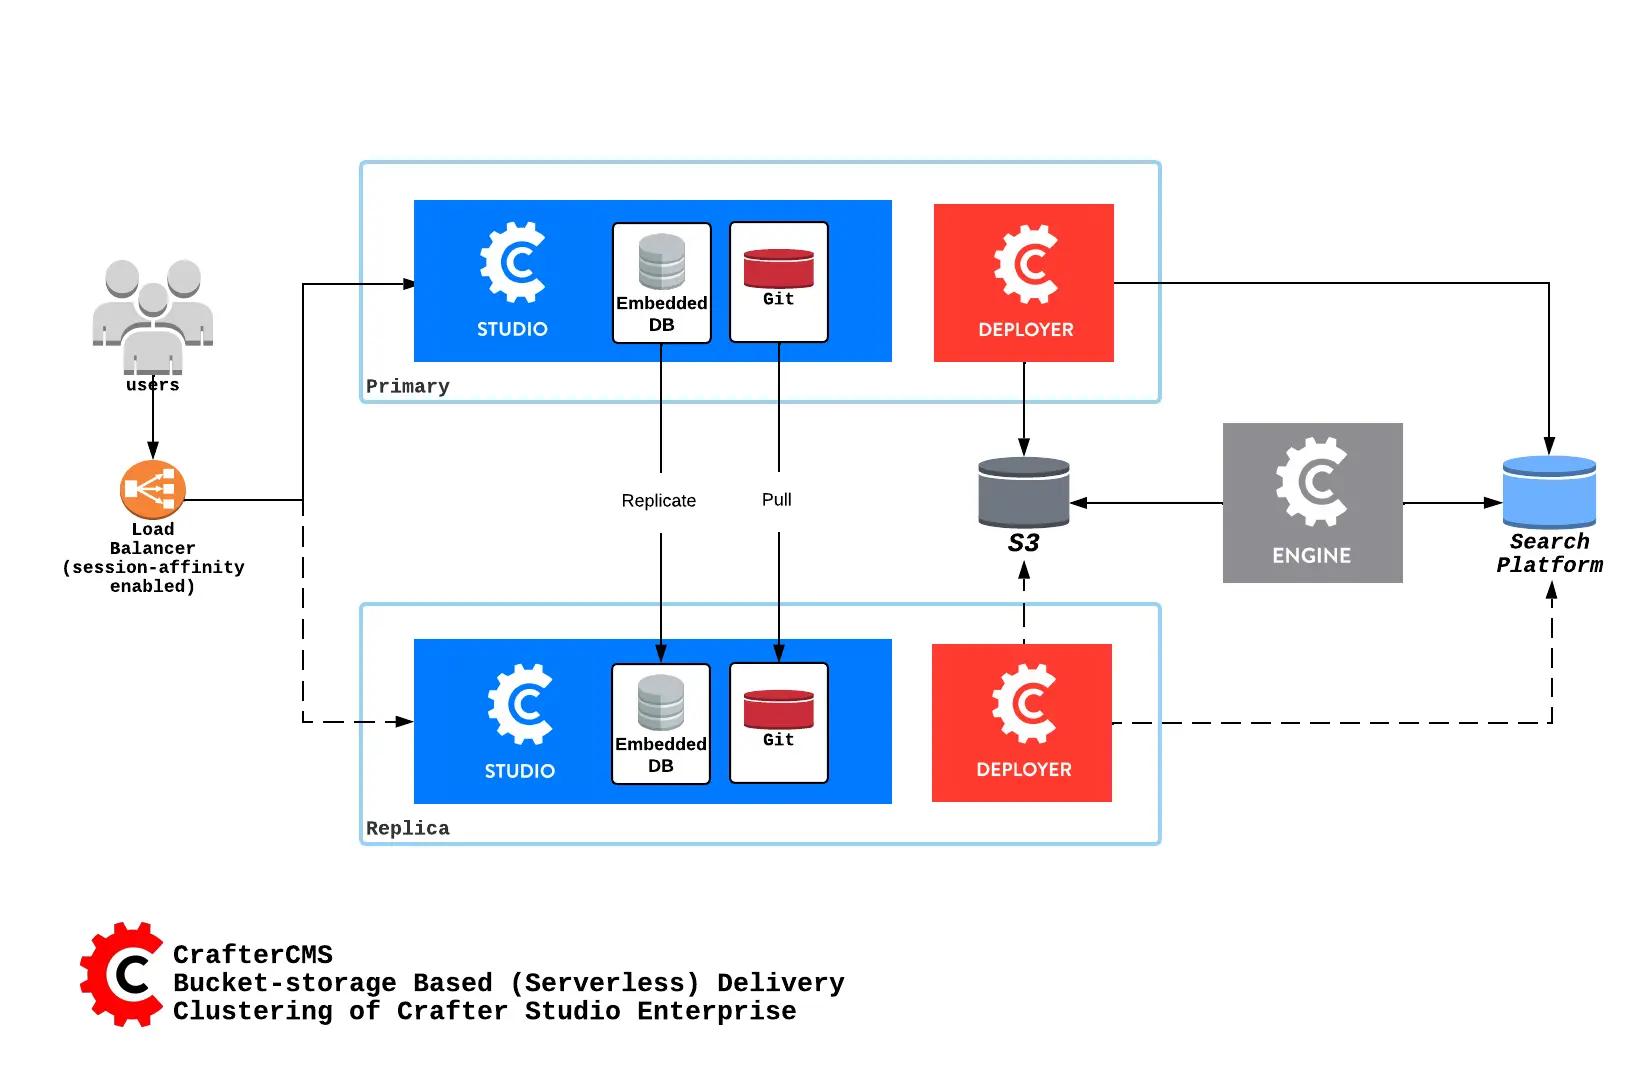
Here’s an overview of a serverless Studio Enterprise cluster:
Here’s an overview of a disk-based Studio Enterprise cluster:
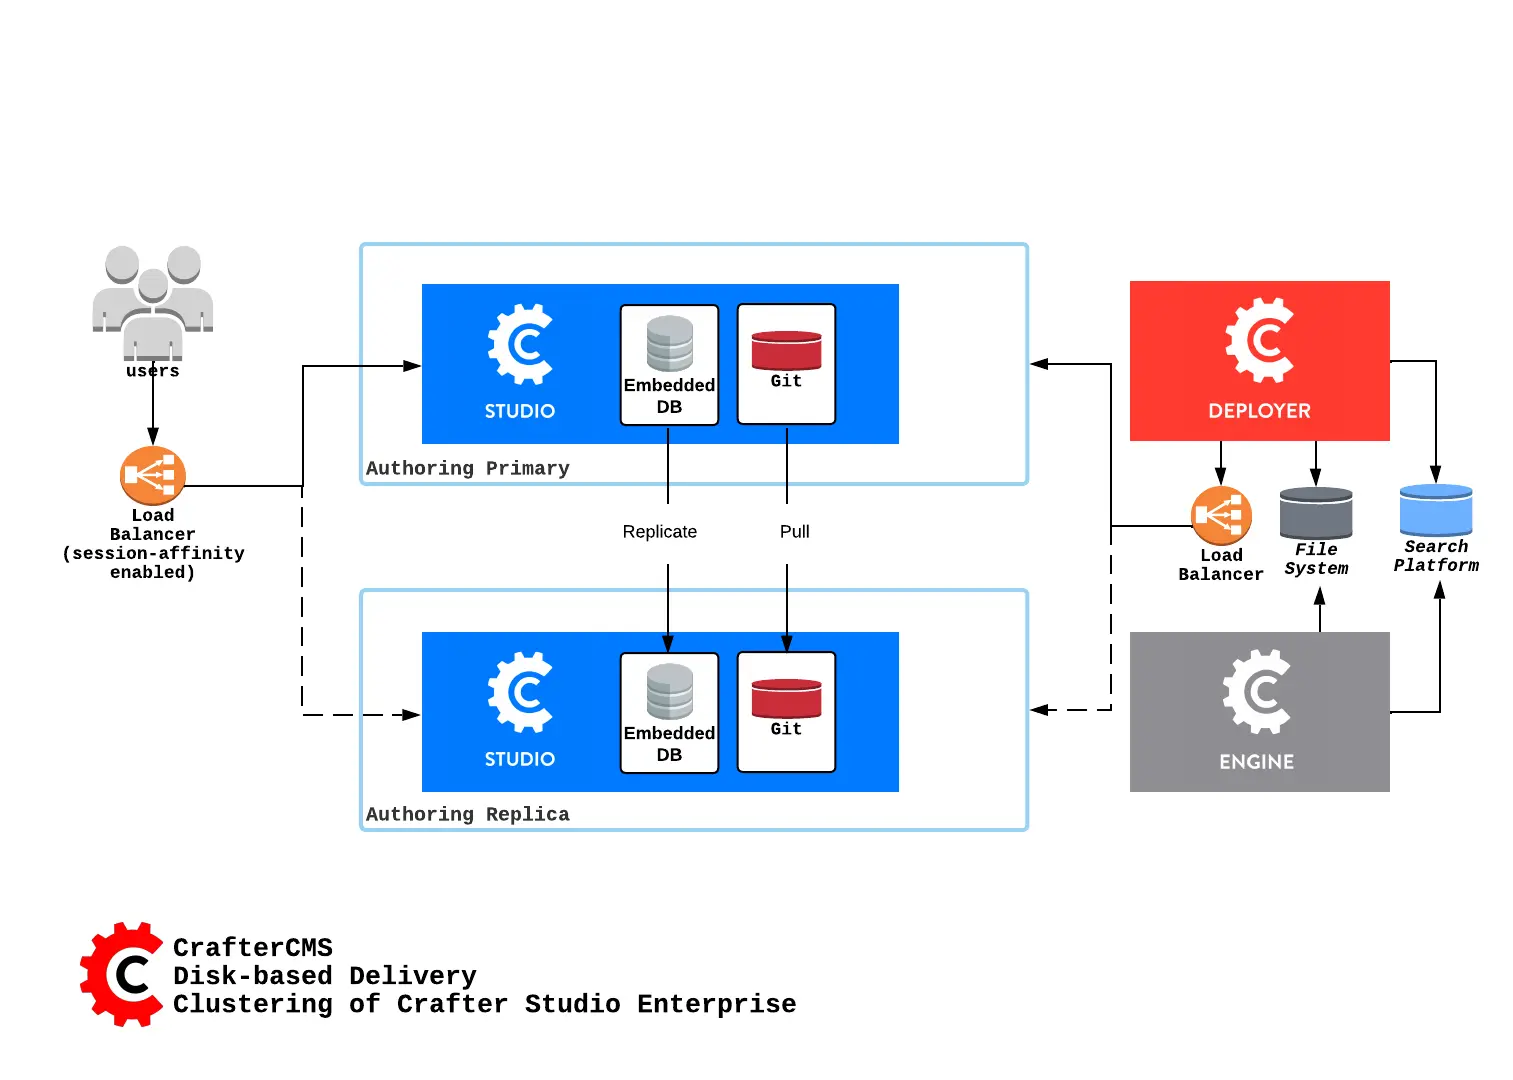
A node is a server running an instance of Crafter Studio and a cluster consists of two or more nodes. In the image above, two Crafter Studio instances are clustered as primary and replica.
When setting up a Studio cluster, a specific node needs to be started first as a reference point, then the other node/s can join and form the cluster. This is known as cluster bootstrapping. Bootstrapping is the first step to introduce a node as Primary Component, which others will see as a reference point to sync up with.
The Primary Component is a central concept on how to ensure that there is no opportunity for database inconsistency or divergence between the nodes in case of a network split. The Primary Component is a set of nodes that communicate with each other over the network and contains the majority of the nodes. There’s no Primary Component yet when starting up a cluster, hence the need of the first node to bootstrap the Component. The other nodes will then look for the existing Primary Component to join.
Note
Studio nodes use an in-memory distributed data store to orchestrate the bootstrapping of the Primary Component, so you don’t need to do it. When the cluster is started, the nodes synchronize through the data store to decide which one does the bootstrapping, and then the rest join the Primary Component.
Once the cluster is up, one node in the cluster is elected to be the primary and the rest of the node(s) as replica(s). Deployment processors can be configured when Studio Clustering is setup.
Crafter Studio provides a Cluster tool that allows administrators to monitor the status of nodes in the cluster.
To access the Cluster tool, click the Navigation Menu icon from the top right of the browser, then click on Cluster
from the Sidebar.
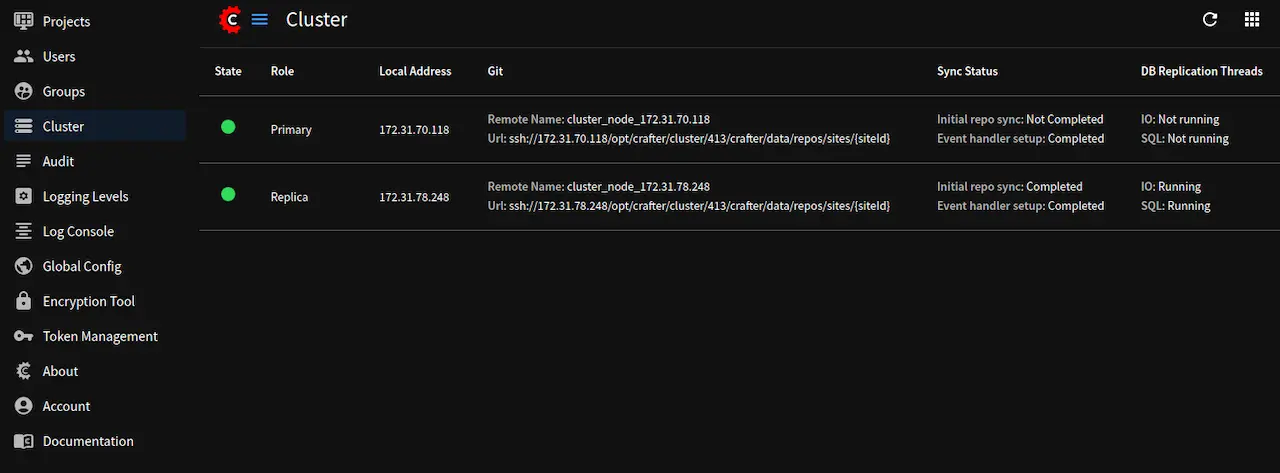
The Cluster tool provides the following information on the nodes in the cluster:
State: Indicates whether the node isACTIVE(green dot),STARTING(yellow dot) orOUT_OF_SYNC(red dot)Role: Indicates whether the node is thePrimaryor aReplicaLocal Address: The local address of the nodeGit: The Git remote name and URLSync Status: Displays the sync status of the node where:Event handler setup: Indicates whether the node is ready to receive eventsInitial repo sync: Indicates whether the node is done syncing when bootstrapping a new replica. Note: This only applies to nodes with theReplicarole
DB Replication Threads: Indicates whether the Replication I/O thread (IO) and the Replication SQL thread (SQL) are running. Note: This only applies to nodes with theReplicarole
Requirements
Before we begin configuring Studio for clustering, the following must be setup:
A load balancer or DNS server directing traffic to the primary node, and can failover to the replica node if the primary is not healthy
Configuration
We’ll take a look at an example of how to setup a two node cluster with Studio step by step here. Afterwards, you can then take a look at an example of setting up Studio clustering using a Kubernetes deployment
Setup a Two Node Cluster with Studio
In this section, we’ll look at an example of how to setup a two node cluster with Studio.
To setup a two node cluster with Studio we’ll need to do the following:
Configure Nodes in the Cluster
Start the Nodes in the Cluster
Requirements
At least 2 servers running Linux (Remember that Studio’s cluster runs only in Linux) with the following ports open:
8080for http33306for the DB5701for hazelcast
Enterprise version of CrafterCMS
Studio’s clustering requires the
libssl1.0.0(orlibssl1.0.2) shared library. Some Linux distros does not come with the library pre-installed and may need to be installed.
Configuring Nodes in the Cluster
Install the Enterprise version of CrafterCMS on all the nodes
Configure the Git repository clustering for all nodes by configuring the following settings in the
studio-config-override.yamlfile.bin/apache-tomcat/shared/classes/crafter/studio/extension/studio-config-override.yaml¶################################################## ## Clustering ## ################################################## # ------------------------------------------------------------------------------------- # IMPORTANT: To enable clustering, please specify the following Spring profile # in your crafter-setenv.sh: # - SPRING_PROFILES_ACTIVE=crafter_studio_dbClusterPrimaryReplica # You will need to uncomment the Hazelcast and Studio DB Cluster property sections too # ------------------------------------------------------------------------------------- # Cluster Git URL format for synching members. # - Typical SSH URL format: ssh://{username}@{localAddress}{absolutePath} # - Typical HTTPS URL format: https://{localAddress}/repos/sites studio.clustering.sync.urlFormat: ssh://{username}@{localAddress}{absolutePath} # Notifications #studio.notification.cluster.startupError.subject: "Action Required: Studio Cluster Error" #studio.notification.cluster.startupError.template: startupError.ftl #studio.notification.cluster.startupError.recipients: admin@example.com # Cluster member registration, this registers *this* server into the pool # Cluster node registration data, remember to uncomment the next line studio.clustering.node.registration: # This server's local address (reachable to other cluster members). You can also specify a different port by # attaching :PORT to the address (e.g. 192.168.1.200:2222) # localAddress: ${env:CLUSTER_NODE_ADDRESS} # Authentication type to access this server's local repository # possible values # - none (no authentication needed) # - basic (username/password authentication) # - key (ssh authentication) authenticationType: none # Username to access this server's local repository # username: user # Password to access this server's local repository # password: SuperSecurePassword # Private key to access this server's local repository (multiline string) # privateKey: | # -----BEGIN PRIVATE KEY----- # privateKey # -----END PRIVATE KEY-----
Uncomment and leave the value of studio.clustering.node.registration.localAddress as
${env:CLUSTER_NODE_ADDRESS}(you will configure the node address in a later step), then configure the repository authentication:studio.clustering.node.registration.authenticationType: authentication type to access this server’s local repository
studio.clustering.node.registration.username: username to access this server’s local repository
studio.clustering.node.registration.password: password to access this server’s local repository
studio.clustering.node.registration.privateKey: private key to access this server’s local repository (multiline string) when using
keyas authentication type to access this server’s local repository
Note
You can use the node’s default SSH keys, located in
~/.ssh/id_rsaand~/.ssh/id_rsa.pub, if you set theauthenticationTypetonone. You can also use~/.ssh/configif you need to configure certain aspects of SSH authentication, likeStrictHostKeyChecking. For example, you can disableStrictHostKeyCheckingfor hostnames with*.hostnamespaceso that you don’t need to validate the SSH host keys before running Studio:Host *.hostnamespace StrictHostKeyChecking nostudio.notification.cluster.startupError.subject: subject for the email
studio.notification.cluster.startupError.template: template used for the email message
studio.notification.cluster.startupError.recipients: list of emails to send the notification, must be separated by commas.
Configure the Hazelcast configuration file location in Studio, by uncommenting
studio.hazelcast.config.location. You will create the Hazelcast configuration file in a later step.bin/apache-tomcat/shared/classes/crafter/studio/extension/studio-config-override.yaml¶################################################## ## Hazelcast ## ################################################## # Location of the Hazelcast config path (must be in YAML format) studio.hazelcast.config.location: classpath:crafter/studio/extension/hazelcast-config.yaml
Configure the following times and locations. Leave the environment variables, e.g.
${env:MARIADB_CLUSTER_NAME}. You can see the configuration of the environment variables in a later step.bin/apache-tomcat/shared/classes/crafter/studio/extension/studio-config-override.yaml¶################################################## ## Studio DB Cluster ## ################################################## # DB cluster name studio.db.cluster.name: ${env:MARIADB_CLUSTER_NAME} # Count for the number of Studio cluster members studio.db.cluster.nodes.count: ${env:MARIADB_CLUSTER_NODE_COUNT} # DB cluster address of the local node (which will be seen by other members of the cluster) studio.db.cluster.nodes.local.address: ${env:MARIADB_CLUSTER_NODE_ADDRESS} # DB cluster name of the local node (which will be seen by other members of the cluster) studio.db.cluster.nodes.local.name: ${env:MARIADB_CLUSTER_NODE_NAME} # Time in seconds when each Studio member of the DB cluster should report its status studio.db.cluster.nodes.status.report.period: 30 # Time in seconds when each report of a DB member should expire (needs to be higher than the report period) studio.db.cluster.nodes.status.report.ttl: 60 # Time in seconds before giving up on waiting for all cluster members to appear online on startup studio.db.cluster.nodes.startup.wait.timeout: 300 #Time in seconds before giving up on waiting for cluster bootstrap to complete (at least a node is active, # which means the node is synced AND its Studio has finished starting up) studio.db.cluster.bootstrap.wait.timeout: 180
Configure the environment variables for the nodes in the
crafter-setenv.shfile.bin/crafter-setenv.sh¶# Uncomment to enable clustering export SPRING_PROFILES_ACTIVE=crafter_studio_dbClusterPrimaryReplica ... # -------------------- Cluster variables ------------------- export CLUSTER_NODE_ADDRESS=${CLUSTER_NODE_ADDRESS:="$(hostname -i)"} # -------------------- MariaDB Cluster variables -------------------- export MARIADB_CLUSTER_NAME=${MARIADB_CLUSTER_NAME:="studio_db_cluster"} export MARIADB_CLUSTER_NODE_COUNT=${MARIADB_CLUSTER_NODE_COUNT:="2"} export MARIADB_CLUSTER_NODE_ADDRESS=${MARIADB_CLUSTER_NODE_ADDRESS:="$(hostname -i)"} export MARIADB_CLUSTER_NODE_NAME=${MARIADB_CLUSTER_NODE_NAME:="$(hostname)"} # Uncomment to enable primary/replica clustering # CRAFTER_DB_CLUSTER_SERVER_ID must have different value across cluster nodes. Value is numeric with range 1 to 4294967295 IP="$CLUSTER_NODE_ADDRESS" OCTET_0=`expr match "$IP" '\([0-9]\+\)\..*'` OCTET_1=`expr match "$IP" '[0-9]\+\.\([0-9]\+\)\..*'` OCTET_2=`expr match "$IP" '[0-9]\+\.[0-9]\+\.\([0-9]\+\)\..*'` OCTET_3=`expr match "$IP" '[0-9]\+\.[0-9]\+\.[0-9]\+\.\([0-9]\+\)'` BIN=$(($((OCTET_0 * $((256**3))))+$((OCTET_1 * $((256**2))))+$((OCTET_2 * 256))+$((OCTET_3 * 1)))) # CRAFTER_DB_CLUSTER_SERVER_ID must have different value across cluster nodes. Value is numeric with range 1 to 4294967295 export CRAFTER_DB_CLUSTER_SERVER_ID=${CRAFTER_DB_CLUSTER_SERVER_ID:="$BIN"} # Cluster bin log base name for primary replica replication export CRAFTER_DB_CLUSTER_LOG_BASENAME=${CRAFTER_DB_CLUSTER_LOG_BASENAME:="crafter_cluster"} # Cluster wait interval for replica to be ready on startup export CRAFTER_DB_CLUSTER_REPLICA_READY_WAIT_INTERVAL=${CRAFTER_DB_CLUSTER_REPLICA_READY_WAIT_INTERVAL:="30000"} # Database replication user export MARIADB_REPLICATION_USER=${MARIADB_REPLICATION_USER:="crafter_replication"} # Database replication password export MARIADB_REPLICATION_PASSWD=${MARIADB_REPLICATION_PASSWD:="crafter_replication"}
where:
SPRING_PROFILES_ACTIVE: with the value
crafter_studio_dbClusterPrimaryReplica, enables primary/replica clusteringCLUSTER_NODE_ADDRESS: hostname or IP of the local node to be registered in the Git repository cluster, should be reachable to other cluster members.
MARIADB_CLUSTER_NAME: name of the MariaDB cluster.
MARIADB_CLUSTER_NODE_COUNT: the number of Studio nodes in the cluster.
MARIADB_CLUSTER_NODE_ADDRESS: hostname of IP of the local node to be registered to the MariaDB cluster, should be reachable to other cluster members.
MARIADB_CLUSTER_NODE_NAME: name of cluster node to be registered to the MariaDB cluster.
Create a Hazelcast configuration file in
shared/classes/crafter/studio/extension/hazelcast-config.yaml.Studio uses Hazelcast as the in-memory distributed data store to orchestrate the bootstrapping of the MariaDB cluster. You can find more about Hazelcast in https://hazelcast.org/ and its configuration in https://docs.hazelcast.org/docs/latest/manual/html-single/#understanding-configuration. In this configuration file you specify the way the nodes discover each other in the Hazelcast cluster.
We recommend you create a simple configuration in each node with the list of addresses of the cluster nodes:
bin/apache-tomcat/shared/classes/crafter/studio/extension/hazelcast-config.yaml¶hazelcast: network: join: multicast: enabled: false tcp-ip: enabled: true member-list: - 192.168.56.1 - 192.168.56.114
If using Kubernetes, Studio also supports configuration through the Kubernetes Hazelcast Plugin:
bin/apache-tomcat/shared/classes/crafter/studio/extension/hazelcast-config.yaml¶hazelcast: network: join: multicast: enabled: false kubernetes: enabled: true namespace: default service-name: authoring-service-headless resolve-not-ready-addresses: true
Note
Please apply the
rbac.yamlmentioned in the Kubernetes Hazelcast Plugin documentation in your Kubernetes cluster, before even starting any Studio pods.
Starting the Nodes in the Cluster
After finishing the node configurations, we are now ready to start the cluster. Please start the cluster nodes
in close succession, one after the other. If you take more than 5 minutes to start all the cluster nodes then
the nodes already running will timeout while trying to synchronize for bootstrapping (you can configure this
timeout in the bin/apache-tomcat/shared/classes/crafter/studio/extension/studio-config-override.yaml file,
under the property studio.db.cluster.nodes.startup.wait.timeout).
Configuring the Deployer for Studio Clustering
Since 4.1.1The deployer is cluster aware and is able to run deployment processors based on the value set in the deployment processor property runInClusterMode (described here) and the value returned by the Studio clusterMode API.
The runInClusterMode property can be configured for any processor in the deployer target context xml, e.g:
...
<bean id="gitDiffProcessor" parent="deploymentProcessor"
      class="org.craftercms.deployer.impl.processors.git.GitDiffProcessor">
    <property name="localRepoFolder" value="${target.localRepoPath}"/>
    <property name="blobFileExtension" value="${deployer.main.targets.config.blob.file.extension}"/>
    <property name="processedCommitsStore" ref="processedCommitsStore"/>
    <property name="runInClusterMode" value="ALWAYS" />
</bean>
Or in the target yaml configuration:
...

- processorName: searchIndexingProcessor
  excludeFiles: ['^/sources/.*$']
  runInClusterMode: "ALWAYS"
Remember that the clusterMode API needs the studioManagementToken configured in the target like below:
target:
  ...
  ...
  studioUrl: http://localhost:8080/studio
  studioManagementToken: ${deployer.main.management.studioAuthorizationToken}
  ...
  ...
The deployment processor configured above runs whenever the clusterMode returned is not UNKNOWN and meets one of the following conditions:
runInClusterModeis set toALWAYSrunInClusterModevalue matches the currentclusterMode
Failover
Studio clustering is based on Primary/Replica clustering mechanics. Failure scenarios:
Replica node(s) failure: In case of one or more replicas failing, the cluster will continue to work normally. New replicas can join and catch up.
Primary node failure: In case of the primary node failing, the load balancer or DNS must either automatically or manually redirect or repoint traffic to the next healthy node.
The replicas will automatically perform an election and appoint a new primary. The new primary’s health check will report that it’s ready to receive traffic, the load balancer or DNS can then redirect or repoint traffic to the new primary.
As a new node or the old failed primary rejoin the cluster, they’ll assume a replica role and catch up with the new primary.
Crafter Studio provides a health check endpoint at /studio/api/2/monitoring/status?token={your management token}. You can use this endpoint to check the health of any node in the cluster. This can be used to facilitate automatic failover.
Multi-Region Considerations
For clusters with nodes in multi-regions utilizing S3 buckets, AWS provides solutions for handling multi-region deployments of S3 buckets.
AWS supports access points for managing access to a shared bucket on S3. For more information on Amazon S3 Access Points, see https://docs.aws.amazon.com/AmazonS3/latest/userguide/access-points.html
For clusters with S3 buckets located in multiple AWS regions, Amazon S3 Multi-Region Access Points provide a global endpoint that applications can use to fulfill requests from. For more information on Multi-Region Access Points in Amazon S3, see https://docs.aws.amazon.com/AmazonS3/latest/userguide/MultiRegionAccessPoints.html
AWS S3 also supports bucket replication (S3 replication) irrespective of the region they belong to, which provides data protection against disasters, minimizing latency, etc. For more information on S3 bucket replication for use with multi-region access points, see https://docs.aws.amazon.com/AmazonS3/latest/userguide/MultiRegionAccessPointBucketReplication.html
Here’s some more information on S3 replication: https://aws.amazon.com/about-aws/whats-new/2020/12/amazon-s3-replication-adds-support-two-way-replication/
Backup and Restore
CrafterCMS comes with a script to backup and restore your environment, as described here
There are a couple of ways to backup and restore your cluster:
Shutdown the cluster first then back up the Primary and the Replicas and restore both nodes when necessary
Shutdown the cluster first then backup and restore only 1 node (Primary or Replica), which will become Primary. You then have to add a Replica using the instructions here.
Troubleshooting
Check if the Cluster is Running
There are a few ways to check that the cluster is running.
via logs
via the status
via the Global Transaction ID
via the
Clustertool in Studio UI
Via Logs
To check that the cluster is up, you can inspect the $CRAFTER_HOME/logs/tomcat/catalina.out of the nodes for
the following entries:
Primary starting up (one of the nodes):
[INFO] 2022-01-28T18:07:54,009 [main] [cluster.DbPrimaryReplicaClusterSynchronizationServiceImpl] | Synchronizing startup of node 192.168.56.1 with DB cluster 'studio_db_cluster'
28-Jan-2022 18:07:54.016 INFO [main] com.hazelcast.internal.partition.impl.PartitionStateManager.null [192.168.56.1]:5701 [dev] [4.2.4] Initializing cluster partition table arrangement...
[INFO] 2022-01-28T18:07:54,178 [main] [cluster.DbPrimaryReplicaClusterSynchronizationServiceImpl] | Waiting for initial report of all 2 DB cluster members...

...

[INFO] 2022-01-28T18:08:24,237 [main] [cluster.DbPrimaryReplicaClusterSynchronizationServiceImpl] | Waiting for initial report of all 2 DB cluster members...
[INFO] 2022-01-28T18:08:54,241 [main] [cluster.DbPrimaryReplicaClusterSynchronizationServiceImpl] | All 2 DB cluster members have started up
[ERROR] 2022-01-28T18:08:54,242 [main] [cluster.DbPrimaryReplicaClusterSynchronizationServiceImpl] |

DbPrimaryReplicaClusterMember {address='192.168.56.1', port='33306', name='192.168.56.1', status='null', timestamp=1643389674007, primary=false, file='null', position=0, replica=false, ioRunning='null', sqlRunning='null', secondsBehindMaster=9223372036854775807}


[INFO] 2022-01-28T18:08:54,251 [main] [cluster.DbPrimaryReplicaClusterSynchronizationServiceImpl] | Local DB cluster node will start primary.
[INFO] 2022-01-28T18:08:54,252 [main] [mariadb4j.DB] | Starting up the database...
Rest of the nodes:
[INFO] 2022-01-28T18:08:28,078 [main] [cluster.DbPrimaryReplicaClusterSynchronizationServiceImpl] | Synchronizing startup of node 192.168.56.114 with DB cluster 'studio_db_cluster'
[INFO] 2022-01-28T18:08:28,153 [main] [cluster.DbPrimaryReplicaClusterSynchronizationServiceImpl] | Waiting for initial report of all 2 DB cluster members...
[INFO] 2022-01-28T18:08:58,167 [main] [cluster.DbPrimaryReplicaClusterSynchronizationServiceImpl] | All 2 DB cluster members have started up
[ERROR] 2022-01-28T18:08:58,169 [main] [cluster.DbPrimaryReplicaClusterSynchronizationServiceImpl] |

DbPrimaryReplicaClusterMember {address='192.168.56.114', port='33306', name='192.168.56.114', status='null', timestamp=1643389708075, primary=false, file='null', position=0, replica=false, ioRunning='null', sqlRunning='null', secondsBehindMaster=9223372036854775807}


[INFO] 2022-01-28T18:08:58,183 [main] [cluster.DbPrimaryReplicaClusterSynchronizationServiceImpl] | Waiting for primary to start...
[INFO] 2022-01-28T18:09:28,195 [main] [cluster.DbPrimaryReplicaClusterSynchronizationServiceImpl] | primary started
[INFO] 2022-01-28T18:09:28,202 [main] [mariadb4j.DB] | Starting up the database...
Via the Status
You can also check that the cluster is working by logging into MariaDB with the mysql client from the
primary or the replica and checking the status:
From the command line in the server, go to
$CRAFTER_HOME/bin/dbms/binand run themysqlprogram./mysql -S /tmp/MariaDB4j.33306.sock
Inside the MySQL client, run the following:
Primary:
SHOW MASTER STATUS\GMariaDB [crafter]> SHOW MASTER STATUS\G *************************** 1. row *************************** File: crafter_cluster-bin.000001 Position: 2812853 Binlog_Do_DB: Binlog_Ignore_DB: 1 row in set (0.000 sec)Replica:
SHOW SLAVE STATUS\GMariaDB [crafter]> SHOW SLAVE STATUS\G [42/1943] *************************** 1. row *************************** Slave_IO_State: Waiting for master to send event Master_Host: 172.31.70.118 Master_User: crafter_replication Master_Port: 33306 Connect_Retry: 60 Master_Log_File: crafter_cluster-bin.000001 Read_Master_Log_Pos: 2776943 Relay_Log_File: crafter_cluster-relay-bin.000004 Relay_Log_Pos: 656828 Relay_Master_Log_File: crafter_cluster-bin.000001 Slave_IO_Running: Yes Slave_SQL_Running: Yes ..... ........
Via the Global Transaction ID
On a primary server, all database updates are written into the binary log as binlog events. A replica server
connects to the primary and reads the binlog events, then applies the events locally to replicate
the changes in the primary. For each event group (transaction) in the binlog, a unique id is attached
to it, called the Global Transaction ID or GTID.
To check our cluster, we can check the gtid_current_pos system variable in the primary and
the gtid_slave_pos system variable in the replica.
The gtid_current_pos system variable contains the GTID of the last transaction applied to the database
for each replication domain. The value is read-only, but it is updated whenever a transaction is written
to the binary log and/or replicated by a replica thread, and that transaction’s GTID is considered newer
than the current GTID for that domain.
The gtid_slave_pos system variable contains the GTID of the last transaction applied to the database by the server’s replica threads for each replication domain. This system variable’s value is automatically updated whenever a replica thread applies an event group.
To learn more about the global transaction ID, see https://mariadb.com/kb/en/gtid/
To check the gtid_current_pos and gtid_slave_pos system variables, log into MariaDB with the
mysql client from the primary or the replica:
From the command line in the server, go to
$CRAFTER_HOME/bin/dbms/binand run themysqlprogram./mysql -S /tmp/MariaDB4j.33306.sock
Inside the MySQL client, run the following:
Primary:
SELECT @@GLOBAL.gtid_current_pos;MariaDB [(none)]> SELECT @@GLOBAL.gtid_current_pos; +---------------------------+ | @@GLOBAL.gtid_current_pos | +---------------------------+ | 0-167772164-2132 | +---------------------------+ 1 row in set (0.000 sec)
Replica:
SELECT @@GLOBAL.gtid_slave_pos;MariaDB [(none)]> SELECT @@GLOBAL.gtid_slave_pos; +-------------------------+ | @@GLOBAL.gtid_slave_pos | +-------------------------+ | 0-167772164-2145 | +-------------------------+ 1 row in set (0.000 sec)
Via Studio UI
Crafter Studio provides a tool for checking on the status of your cluster. To open the tool, click the Navigation Menu
icon from the top right of the browser, then click on Cluster from the Sidebar.
The above image shows a working cluster. See the Cluster Tool section above for more information on the items displayed in the tool.
Git/DB Sync Failure
Whenever your authoring cluster has a Git or DB sync failure, the following logs may appear:
[ERROR] 2022-10-19T17:22:24,358 [main] [validation.ReplicaNodeRepositoryCheck] | Branch 'master' in repository '/opt/crafter/cluster/crafter/data/repos/sites/ed123/sandbox/.git' has commits ahead of the primary node at '172.31.70.118'
[ERROR] 2022-10-19T17:22:24,359 [main] [validation.NodeStateCheckerImpl] | Failed to start Crafter Studio cluster node due to start-up conflicts. Please review the logs and resolve the conflicts.
[ERROR] 2022-10-19T17:22:24,598 [main] [cluster.StudioClusterUtils] | Error notification email has been sent
...
Caused by: org.craftercms.studio.api.v2.exception.DbClusterStartupException: Failed to start DB replica: Error 'Duplicate entry '4' for key 'PRIMARY'' on query. Default database: 'crafter'. Query: 'INSERT INTO audit (organization_id, site_id, operation, operation_timestamp, origin, primary_target_id,
     primary_target_type, primary_target_subtype, primary_target_value, actor_id, actor_details, cluster_node_id)
     VALUES (1, 1, 'LOGIN', IFNULL(NULL, CURRENT_TIMESTAMP), 'API',
     'admin', 'User', NULL, 'admin', 'admin',
     NULL, '172.31.70.118')'
         at org.craftercms.studio.impl.v2.dal.cluster.DbPrimaryReplicaClusterSynchronizationServiceImpl.checkForErrors(DbPrimaryReplicaClusterSynchronizationServiceImpl.java:598) ~[classes/:4.0.2-SNAPSHOT]
         at org.craftercms.studio.impl.v2.dal.cluster.DbPrimaryReplicaClusterSynchronizationServiceImpl.waitForLocalReplicaToSync(DbPrimaryReplicaClusterSynchronizationServiceImpl.java:571) ~[classes/:4.0.2-SNAPSHOT]
         at org.craftercms.studio.impl.v2.dal.cluster.DbPrimaryReplicaClusterSynchronizationServiceImpl.synchronizeStartup(DbPrimaryReplicaClusterSynchronizationServiceImpl.java:270) ~[classes/:4.0.2-SNAPSHOT]
         at org.craftercms.studio.impl.v2.dal.cluster.DbPrimaryReplicaClusterAwareMariaDB4jSpringService.start(DbPrimaryReplicaClusterAwareMariaDB4jSpringService.java:51) ~[classes/:4.0.2-SNAPSHOT]
         at ch.vorburger.mariadb4j.MariaDB4jService.postConstruct(MariaDB4jService.java:64) ~[mariaDB4j-core-2.5.3.jar:?]
         at jdk.internal.reflect.NativeMethodAccessorImpl.invoke0(Native Method) ~[?:?]
     ...
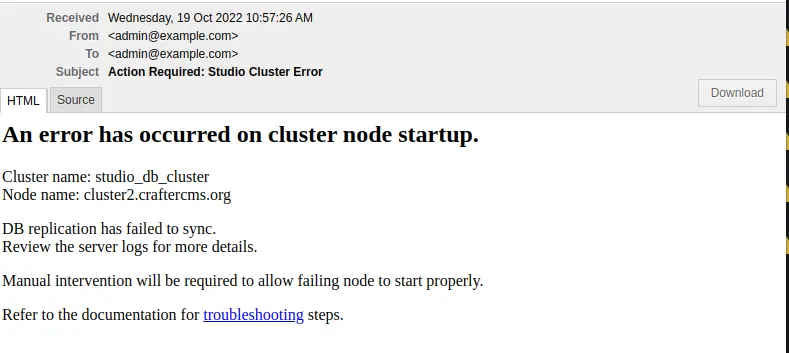
An email will also be sent to the configured list of recipients to inform them of the failure.
See the Setup a Two Node Cluster with Studio article then scroll to the failure notification properties section for more information on how to configure the list of recipients to be informed in case of a startup failure in the authoring cluster.
This section discusses how to fix the sync failure in your authoring cluster.
Fixing the Sync Failure
The first thing to do when a sync failure happens is to figure out whether the sync failure is in the DB or Git. The email sent to configured recipients when the sync failure happened will indicate whether it’s a DB or a Git sync failure. From the logs, you can also determine if it was a DB or a Git sync failure.
DB sync failure
For a DB sync failure, the logs will contain a message like below:
...
Failed to start DB replica:
...
as seen above and the following email will be sent if configured:
Before performing any valid intervention on the database, it will need to be started first, then the user needs to login.
The first thing that needs to be done is to start the database. To start the database, run the following:
CRAFTER_HOME/bin/dbms/bin/mysqld --no-defaults --console --basedir=CRAFTER_HOME/bin/dbms --datadir=CRAFTER_HOME/data/db --port=33306 --socket=/tmp/MariaDB4j.33306.sock --max_allowed_packet=128M --max-connections=500
This is the output when running the command above:
/opt/crafter/bin/dbms/bin/mysqld --no-defaults --console --basedir=/opt/crafter/bin/dbms --datadir=/opt/crafter/data/db --port=33306 --socket=/tmp/MariaDB4j.33306.sock --max_allowed_packet=128M --max-connections=500
2022-10-20 19:49:22 0 [Note] ./mysqld (mysqld 10.4.20-MariaDB) starting as process 8862 ...
2022-10-20 19:49:23 0 [Note] InnoDB: Using Linux native AIO
2022-10-20 19:49:23 0 [Note] InnoDB: Mutexes and rw_locks use GCC atomic builtins
2022-10-20 19:49:23 0 [Note] InnoDB: Uses event mutexes
2022-10-20 19:49:23 0 [Note] InnoDB: Compressed tables use zlib 1.2.11
2022-10-20 19:49:23 0 [Note] InnoDB: Number of pools: 1
2022-10-20 19:49:23 0 [Note] InnoDB: Using SSE2 crc32 instructions
2022-10-20 19:49:23 0 [Note] InnoDB: Initializing buffer pool, total size = 128M, instances = 1, chunk size = 128M
2022-10-20 19:49:23 0 [Note] InnoDB: Completed initialization of buffer pool
2022-10-20 19:49:23 0 [Note] InnoDB: If the mysqld execution user is authorized, page cleaner thread priority can be changed. See the man page of setpriority().
2022-10-20 19:49:23 0 [Note] InnoDB: 128 out of 128 rollback segments are active.
2022-10-20 19:49:23 0 [Note] InnoDB: Creating shared tablespace for temporary tables
2022-10-20 19:49:23 0 [Note] InnoDB: Setting file './ibtmp1' size to 12 MB. Physically writing the file full; Please wait ...
2022-10-20 19:49:23 0 [Note] InnoDB: File './ibtmp1' size is now 12 MB.
2022-10-20 19:49:23 0 [Note] InnoDB: Waiting for purge to start
2022-10-20 19:49:23 0 [Note] InnoDB: 10.4.20 started; log sequence number 1389822; transaction id 407
2022-10-20 19:49:23 0 [Note] InnoDB: Loading buffer pool(s) from /opt/crafter/data/db/ib_buffer_pool
2022-10-20 19:49:23 0 [Note] Plugin 'FEEDBACK' is disabled.
2022-10-20 19:49:23 0 [Note] Server socket created on IP: '::'.
2022-10-20 19:49:23 0 [Note] InnoDB: Buffer pool(s) load completed at 221020 19:49:23
2022-10-20 19:49:23 0 [Note] Reading of all Master_info entries succeeded
2022-10-20 19:49:23 0 [Note] Added new Master_info '' to hash table
2022-10-20 19:49:23 0 [Note] ./mysqld: ready for connections.
Version: '10.4.20-MariaDB'  socket: '/tmp/MariaDB4j.33306.sock'  port: 33306  MariaDB Server
Login to the database by running the following command then entering the database root password:
CRAFTER_HOME/bin/dbms/bin/mariadb -u <db_root_user> -p --socket=/tmp/MariaDB4j.33306.sock
The <db_root_user> by default is
rootwith password set torootor empty. Remember to replace <db_root_user> with the actualrootuser (MARIADB_ROOT_USER) value and enter the actual password (MARIADB_ROOT_PASSWD) value used in your system, which can be found in thecrafter-setenv.shfile under theCRAFTER_HOME/binfolder.In the sample run below, the default root user
rootis used and the corresponding password:./mariadb -u root -p --socket=/tmp/MariaDB4j.33306.sock Enter password: Welcome to the MariaDB monitor. Commands end with ; or \g. Your MariaDB connection id is 8 Server version: 10.4.20-MariaDB MariaDB Server Copyright (c) 2000, 2018, Oracle, MariaDB Corporation Ab and others. Type 'help;' or '\h' for help. Type '\c' to clear the current input statement. MariaDB [(none)]>
The intervention on the database may now be performed once the admin is logged in to the database. After performing the fix, stop the database then restart the node.
If an admin reviews the node states and thinks everything is fine but still receives DB sync errors, the admin may decide if MariaDB should ignore those errors and continue. To ignore the errors, a manual intervention is required and may be done by following the instructions here
Git sync failure
For a Git sync failure, the logs will contain a message like below:
...
Branch 'master' in repository '/opt/crafter/data/repos/sites/ed123/sandbox/.git' has commits ahead of the primary node
...
as seen above and the following email will be sent if configured:

If there is any divergent history, the node will fail to startup and the admins would need to remove any commits “ahead” of primary branch. That would apply for all repositories (global, site sandbox, site published).
After reviewing the logs (tomcat logs and git log), there are a few ways to go about fixing the sync problem:
Manually remove the extra commits, do a
git reset --hardManually move the extra commits into the primary corresponding repository
Shutdown new primary and start the failing one as primary
Changing the Cluster Git URL
When the cluster Git URL for syncing members is changed after a cluster has been setup and started, the nodes on the disk may contain the old URL format when starting up. The following error appears in the log when switching the URL from SSH to HTTPS:
[ERROR] 2021-03-12T18:54:02,887 [pool-5-thread-10] [job.StudioClockExecutor] | Error executing Studio Clock Job
java.lang.ClassCastException: org.eclipse.jgit.transport.TransportHttp cannot be cast to org.eclipse.jgit.transport.SshTransport
To sync the Git URL format on disk with the new format set in the config, the remotes will need to be recreated
To recreate a remote:
Stop the cluster
Update the configuration file with the desired URL format in all your nodes
bin/apache-tomcat/shared/classes/crafter/studio/extension/studio-config-override.yaml¶# Cluster Git URL format for synching members. # - Typical SSH URL format: ssh://{username}@{localAddress}{absolutePath} # - Typical HTTPS URL format: https://{localAddress}/repos/sites studio.clustering.sync.urlFormat: ssh://{username}@{localAddress}{absolutePath}
Remove the remotes in all your nodes via the command line interface using
gitin theglobalrepo and thesandboxandpublishedrepos of all the sites in the cluster.The global repo is located in CRAFTER_HOME/data/repos/global, the
sandboxrepo of a site is located in CRAFTER_HOME/data/repos/sites/<site-name>/sandbox and thepublishedrepo of a site is located in CRAFTER_HOME/data/repos/sites/<site-name>/publishedThe cluster remote names are available from
Clusterin the Studio global menu.
Remember to only remove the cluster remotes. Cluster remote names start with
cluster_. See example below:List of remotes for the sandbox repository of site video¶$ git remote -v cluster_node_192.168.1.103 ssh://myuser@192.168.1.103/opt/crafter/data/repos/sites/video/sandbox (fetch) cluster_node_192.168.1.103 ssh://myuser@192.168.1.103/opt/crafter/data/repos/sites/video/sandbox (push) origin https://github.com/craftercms/video-center-blueprint.git (fetch) origin https://github.com/craftercms/video-center-blueprint.git (push)
To remove a remote, run
git remote rm <remote_name>, whereremote_nameis the name of remote as seen from theClusterscreen in the Studio Main Menu. Let’s use the remote namecluster_node_192.168.1.103for our example on removing a remoteRemove remote¶$ git remote rm cluster_node_192.168.1.103
To verify the remotes are gone on disk, view the current remotes and make sure that the list does not contain a remote with a name beginning with
cluster_xxxx:View current remotes¶$ git remote -v origin https://github.com/craftercms/video-center-blueprint.git (fetch) origin https://github.com/craftercms/video-center-blueprint.git (push)
Start the cluster. Once the cluster is started, the remotes will be recreated. Verify that the URL format displayed in
Clusterin the Studio global menu is the desired URL format.