Crafter Studio Plugin Examples
Crafter Studio supports several types of authoring plugins. UI widget plugins add React components to extension points in the Studio interface. Form Engine control plugins add custom input controls to content types. Form Engine data source plugins add custom data pickers that controls use to retrieve content.
This article walks through creating each type of plugin and wiring it into Studio.
Here’s a list of the plugin examples described in this article:
Plugin Type |
Plugin |
Where it appears |
|---|---|---|
|
The panel on the left of Studio |
|
|
The panel on the right of Studio, shown in Edit/Move mode |
|
|
The fixed bar at the top of Studio |
|
|
A dashlet on the project dashboard |
|
|
A tool under |
|
|
A tile in the Navigation Menu (Launcher) |
|
|
Overriding the translations for the example placeholder text in the Activity widget in the Dashboard |
|
|
A control in the Content Type Editor |
|
|
A data source in the Content Type Editor |
All the examples below use a project called My Editorial created using the Website Editorial blueprint.
Studio UI Widget Plugins
Creating Your Studio UI Widget Plugin
Here are the steps for creating your Studio UI widget plugin:
Create the folder structure
Create the plugin’s JavaScript file
Auto-wire the plugin
Install the plugin
See it in action
The steps are identical for every UI widget location. The only two things that change are the plugin
type (which is also the CATEGORY directory) and the installation block that positions the widget.
Both of those are provided in the Positioning the Widget in the UI
section for your target location.
Create the folder structure.
We’ll follow the convention listed in UI Plugin Directory Structure,{PLUGIN_DIRECTORY}/authoring/static-assets/plugins/{ID}/{CATEGORY}/{NAME}/, whereCATEGORYis the plugintypefor your target location andNAMEis your plugin name.In a local folder, create the descriptor file
craftercms-plugin.yamland setplugin.id(for example,org.craftercms.plugin.exampleui), then create the directory structure. See the target location’s section below for the exactCATEGORY/NAMEand a concrete tree.Create the plugin’s JavaScript file.
Follow the instructions in the plugin example here, which will generate theindex.jsfile.Inside the
{NAME}folder, create two empty files,index.cssandscript.js, and place theindex.jsfile in it.Auto-wire the plugin.
To have the plugin automatically wired into the corresponding configuration file in Studio (for all these UI locations, that is the User Interface Configuration file) during installation, add aninstallationblock to yourcraftercms-plugin.yamldescriptor file. TheparentXpathandelementdiffer by location — use the snippet from your target location’s section below.Note
Remember to use the same value used in
plugin.id(found at the top of the descriptor file) for theinstallationsection plugin id.See here for more information on how auto-wiring works and what each field in the
installationblock means.Install the plugin.
After placing your plugin files and setting up auto-wiring, install the plugin for testing/debugging using thecrafter-clicommandcopy-plugin.When running a
crafter-clicommand, the connection to CrafterCMS needs to be setup via the add-environment command. Once the connection has been established, install the plugin to the projectmy-editorialby running the following (adjust the--pathto point at your plugin folder):./crafter-cli copy-plugin -e local -s my-editorial --path /users/myuser/myplugins/<plugin-folder>
See it in action.
Reload Studio and open the relevant part of the UI. The exact place to look, along with the resulting auto-wired configuration, is shown in your target location’s section below.
Positioning the Widget in the UI
Each section below provides the location-specific pieces for the process above:
the plugin type, the directory structure, the installation auto-wiring block, where to see the widget
in action, and the resulting section in the User Interface Configuration file after installation.
Sidebar
The Sidebar is the panel located on the left side of Studio, containing the Dashboard, path navigators such
as Pages and Components, and  .
.
For this example, the plugin type (CATEGORY) is sidebar, the NAME is react-sample, and the
plugin.id is org.craftercms.plugin.examplesidebar.
<plugin-folder>/
  craftercms-plugin.yaml
  authoring/
    static-assets/
      plugins/
        org/
          craftercms/
            plugin/
              examplesidebar/
                sidebar/
                  react-sample/
Add the following installation block to your craftercms-plugin.yaml descriptor file:
 1installation:
 2  - type: preview-app
 3    parentXpath: //widget[@id='craftercms.components.ToolsPanel']
 4    elementXpath: //plugin[@id='org.craftercms.sampleSidebarPlugin.components.reactComponent']
 5    element:
 6      name: configuration
 7      children:
 8      - name: widgets
 9        children:
10        - name: widget
11          attributes:
12          - name: id
13            value: org.craftercms.sampleSidebarPlugin.components.reactComponent
14          children:
15          - name: plugin
16            attributes:
17            - name: id
18              value: org.craftercms.plugin.examplesidebar
19            - name: type
20              value: sidebar
21            - name: name
22              value: react-sample
23            - name: file
24              value: index.js
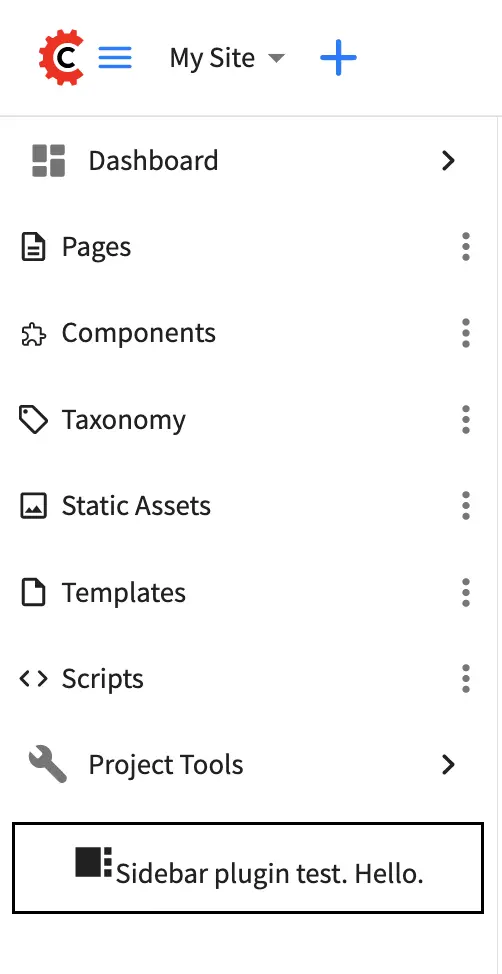
To see the plugin in action, click on the CrafterCMS logo at the top left of your browser to open the sidebar:
Here’s the auto-wired section in the configuration after installing the plugin:
 1<siteUi>
 2  <widget id="craftercms.components.ToolsPanel">
 3    <configuration>
 4    <widgets>
 5      <widget id="craftercms.components.ToolsPanelEmbeddedAppViewButton">
 6         <configuration>
 7            <title id="words.dashboard" defaultMessage="Dashboard"/>
 8            <icon id="@mui/icons-material/DashboardRounded"/>
 9            <widget id="craftercms.components.Dashboard"/>
10         </configuration>
11      </widget>
12      <widget id="craftercms.components.ToolsPanelPageButton">
13         <configuration>
14            <title id="previewSiteExplorerPanel.title" defaultMessage="Site Explorer"/>
15            <icon id="craftercms.icons.SiteExplorer"/>
16         ...
17      </widget>
18      <widget id="craftercms.components.ToolsPanelPageButton">
19         <permittedRoles>
20            <role>admin</role>
21            <role>developer</role>
22         </permittedRoles>
23         <configuration>
24            <title id="siteTools.title" defaultMessage="Project Tools"/>
25            <icon id="@mui/icons-material/TuneRounded"/>
26            <widgets>
27               <widget id="craftercms.components.SiteToolsPanel"/>
28            </widgets>
29         </configuration>
30      </widget>
31      <widget id="org.craftercms.sampleSidebarPlugin.components.reactComponent">
32         <plugin id="org.craftercms.plugin.examplesidebar"
33                 type="sidebar"
34                 name="react-sample"
35                 file="index.js"/>
36      </widget>
37    </widgets>
38  </configuration>
39</widget>
40...
Experience Builder Panel
The Experience Builder panel is the panel on the right of Studio that is enabled by clicking on Edit mode
(pencil icon) or Move mode (two vertical ellipsis icon) on the top right of Studio, or by hitting the
e or m key on your keyboard.
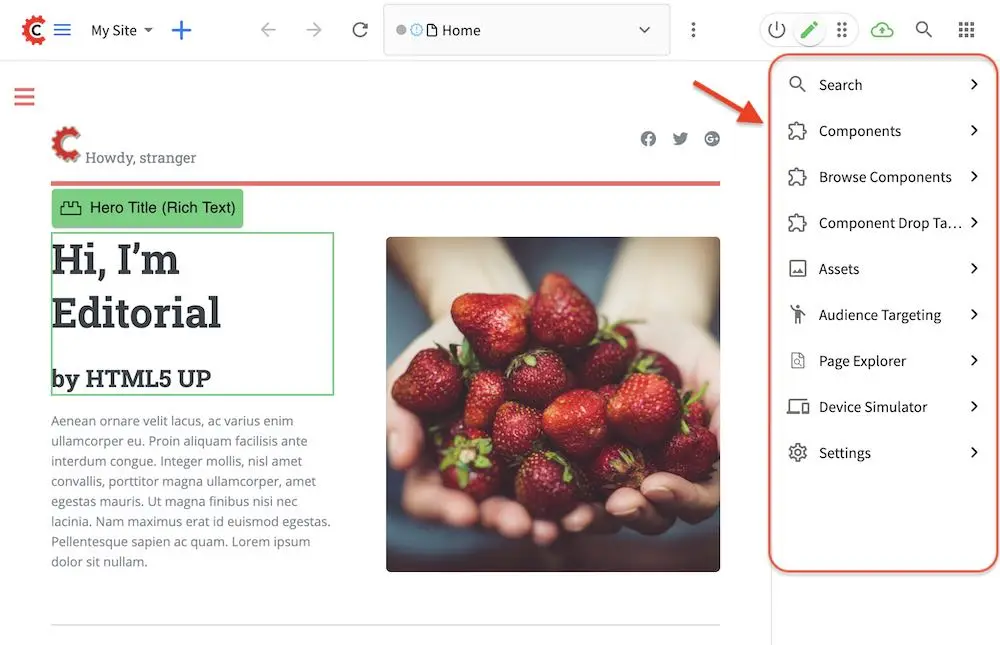
For this example, the plugin type (CATEGORY) is experiencebuilder, the NAME is
test-experiencebuilder, and the plugin.id is org.craftercms.plugin.exampleexperiencebuilder.
<plugin-folder>/
  craftercms-plugin.yaml
  authoring/
    static-assets/
      plugins/
        org/
          craftercms/
            plugin/
              exampleexperiencebuilder/
                experiencebuilder/
                  test-experiencebuilder/
Add the following installation block to your craftercms-plugin.yaml descriptor file:
 1installation:
 2  - type: preview-app
 3    parentXpath: //widget[@id='craftercms.components.ICEToolsPanel']
 4    elementXpath: //plugin[@id='org.craftercms.sampleExperienceBuilderPlugin.components.reactComponent']
 5    element:
 6      name: configuration
 7      children:
 8      - name: widgets
 9        children:
10        - name: widget
11          attributes:
12          - name: id
13            value: org.craftercms.sampleExperienceBuilderPlugin.components.reactComponent
14          children:
15          - name: plugin
16            attributes:
17            - name: id
18              value: org.craftercms.plugin.exampleexperiencebuilder
19            - name: type
20              value: experiencebuilder
21            - name: name
22              value: test-experiencebuilder
23            - name: file
24              value: index.js
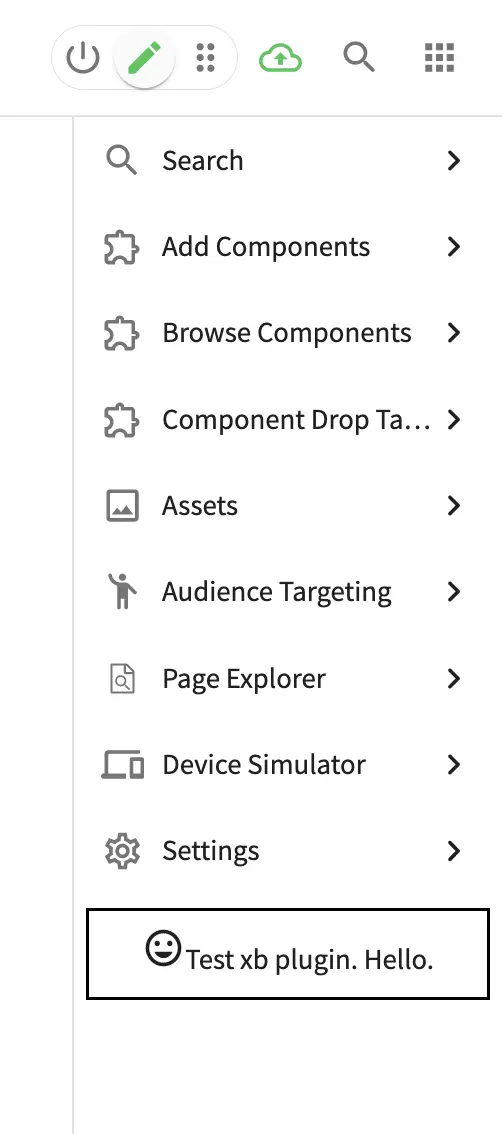
To see the plugin in action, click on the pencil icon at the top right of your browser to open the Experience Builder panel:
Here’s the auto-wired section in the configuration after installing the plugin:
 1<siteUi>
 2  ...
 3  <widget id="craftercms.components.ICEToolsPanel">
 4    <configuration>
 5      <widgets>
 6        <widget id="craftercms.components.ToolsPanelPageButton">
 7          <configuration>
 8            <target id="icePanel"/>
 9            <title id="previewSearchPanel.title" defaultMessage="Search"/>
10            <icon id="@mui/icons-material/SearchRounded"/>
11            <widgets>
12              <widget id="craftercms.components.PreviewSearchPanel"/>
13            </widgets>
14          </configuration>
15        </widget>
16        ...
17        <widget id="org.craftercms.sampleExperienceBuilderPlugin.components.reactComponent">
18          <plugin id="org.craftercms.plugin.exampleexperiencebuilder"
19                  type="experiencebuilder"
20                  name="test-experiencebuilder"
21                  file="index.js"/>
22        </widget>
23       </widgets>
24    </configuration>
25   </widget>
26   ...
Toolbar
The toolbar is a fixed element at the top of Studio. It provides contextual workflow and other options relative to the page you are looking at, content you have selected, or tool you are using.

For this example, the plugin type (CATEGORY) is toolbar, the NAME is test-toolbar, and the
plugin.id is org.craftercms.plugin.exampletoolbar.
<plugin-folder>/
  craftercms-plugin.yaml
  authoring/
    static-assets/
      plugins/
        org/
          craftercms/
            plugin/
              exampletoolbar/
                toolbar/
                  test-toolbar/
Add the following installation block to your craftercms-plugin.yaml descriptor file. Note that a toolbar
widget is wired into one of the toolbar’s sections (leftSection, middleSection, or rightSection);
this example uses rightSection:
 1installation:
 2  - type: preview-app
 3    parentXpath: //widget[@id='craftercms.components.PreviewToolbar']
 4    elementXpath: //plugin[@id='org.craftercms.sampleToolbarPlugin.components.reactComponent']
 5    element:
 6      name: configuration
 7      children:
 8      - name: rightSection
 9        children:
10        - name: widgets
11          children:
12          - name: widget
13            attributes:
14            - name: id
15              value: org.craftercms.sampleToolbarPlugin.components.reactComponent
16            children:
17            - name: plugin
18              attributes:
19              - name: id
20                value: org.craftercms.plugin.exampletoolbar
21              - name: type
22                value: toolbar
23              - name: name
24                value: test-toolbar
25              - name: file
26                value: index.js
To see the plugin in action, refresh your browser:

Here’s the auto-wired section in the configuration after installing the plugin:
 1<siteUi>
 2...
 3  <widget id="craftercms.components.PreviewToolbar">
 4    <configuration>
 5      <leftSection>
 6        <widgets>
 7          <widget id="craftercms.components.SiteSwitcherSelect"/>
 8          <widget id="craftercms.components.QuickCreate"/>
 9        </widgets>
10      </leftSection>
11      <middleSection>
12        <widgets>
13          <widget id="craftercms.components.PreviewAddressBar"/>
14        </widgets>
15      </middleSection>
16      <rightSection>
17        <widgets>
18          <widget id="craftercms.components.EditModesSwitcher"/>
19          <widget id="craftercms.components.PublishingStatusButton">
20            <configuration>
21              <variant>icon</variant>
22            </configuration>
23          </widget>
24          <widget id="craftercms.components.WidgetDialogIconButton">
25            <configuration>
26              <title id="words.search" defaultMessage="Search"/>
27              <icon id="@mui/icons-material/SearchRounded"/>
28              <widget id="craftercms.components.EmbeddedSearchIframe"/>
29            </configuration>
30          </widget>
31          <widget id="org.craftercms.sampleToolbarPlugin.components.reactComponent">
32            <plugin id="org.craftercms.plugin.exampletoolbar"
33                    type="toolbar"
34                    name="test-toolbar"
35                    file="index.js"/>
36          </widget>
37        </widgets>
38      </rightSection>
39    </configuration>
40  </widget>
41  ...
Dashboard
The dashboard contains different dashlets that show, at a glance, all items currently in workflow, all items recently modified by the current user, etc. Dashlets shown vary depending on the user’s role. For more information on the Dashboard, see here.
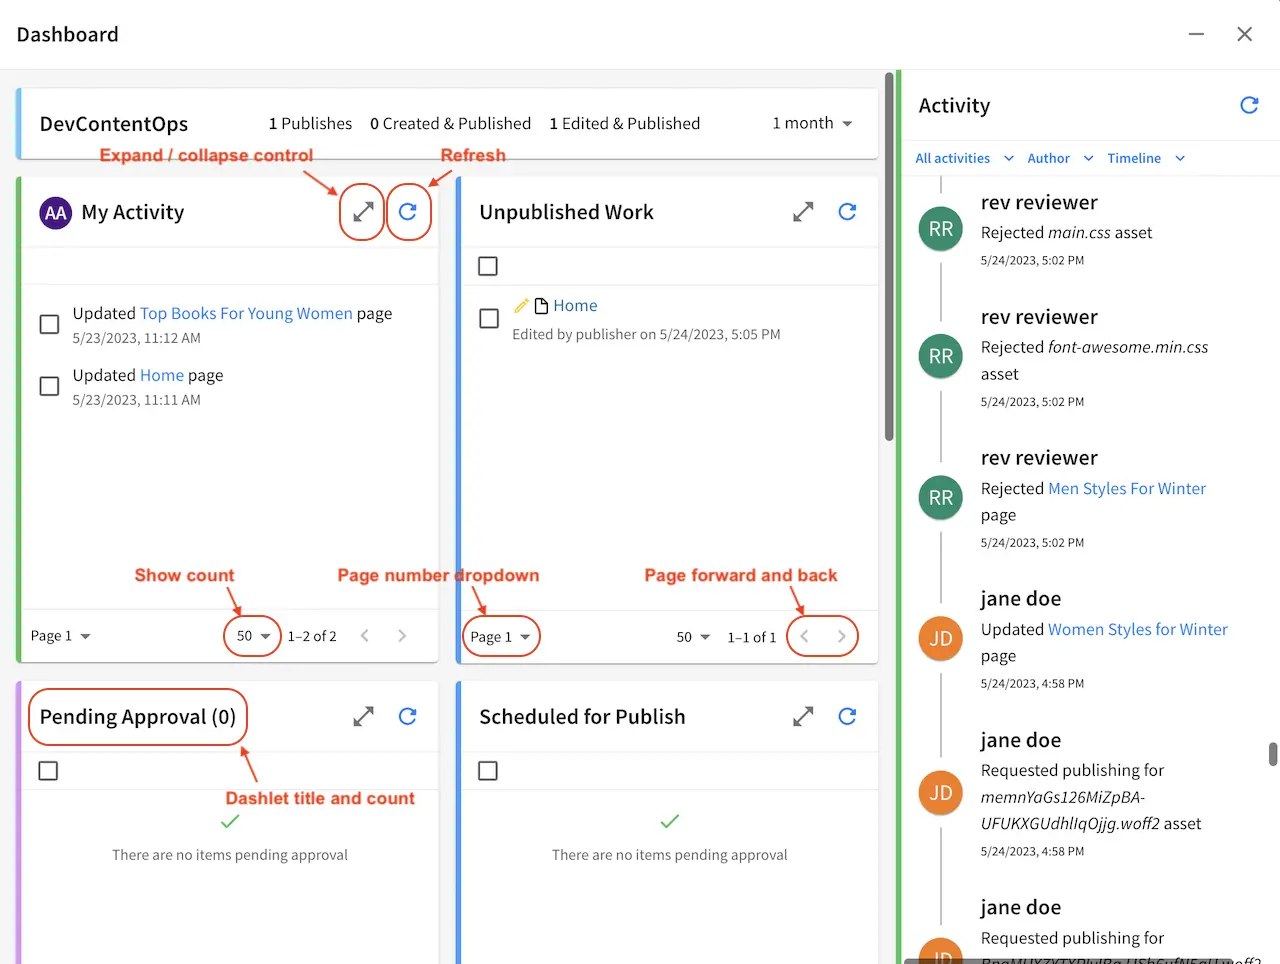
For this example, the plugin type (CATEGORY) is dashboard, the NAME is test-dashboard, and
the plugin.id is org.craftercms.plugin.exampledashboard.
<plugin-folder>/
  craftercms-plugin.yaml
  authoring/
    static-assets/
      plugins/
        org/
          craftercms/
            plugin/
              exampledashboard/
                dashboard/
                  test-dashboard/
Add the following installation block to your craftercms-plugin.yaml descriptor file:
 1installation:
 2  - type: preview-app
 3    parentXpath: /siteUi/widget[@id='craftercms.components.Dashboard']
 4    elementXpath: //plugin[@id='org.craftercms.sampleDashboardPlugin.components.reactComponent']
 5    element:
 6      name: configuration
 7      children:
 8      - name: widgets
 9        children:
10        - name: widget
11          attributes:
12          - name: id
13            value: org.craftercms.sampleDashboardPlugin.components.reactComponent
14          children:
15          - name: plugin
16            attributes:
17            - name: id
18              value: org.craftercms.plugin.exampledashboard
19            - name: type
20              value: dashboard
21            - name: name
22              value: test-dashboard
23            - name: file
24              value: index.js
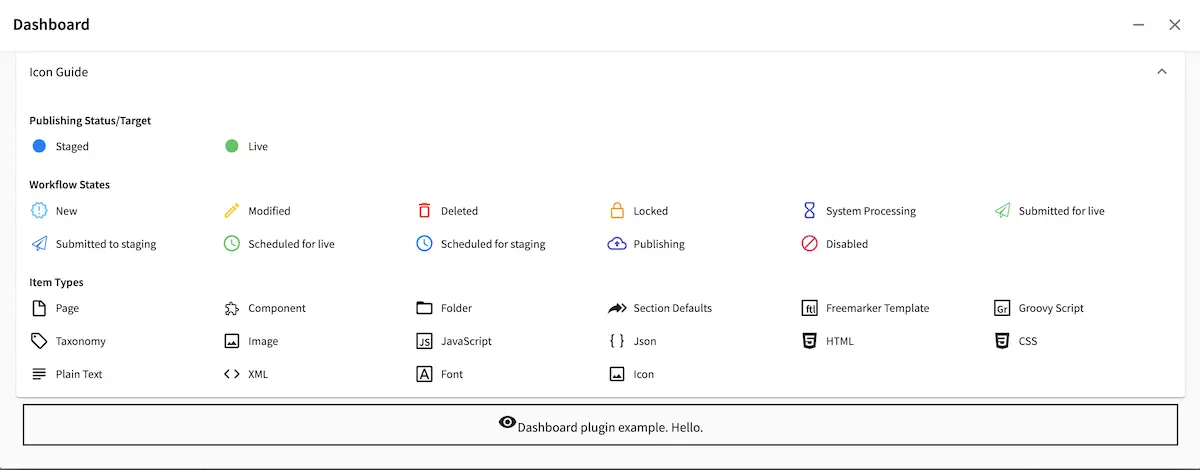
To see the plugin in action, click on the CrafterCMS logo at the top left of your browser to open the sidebar,
then click on Dashboard:
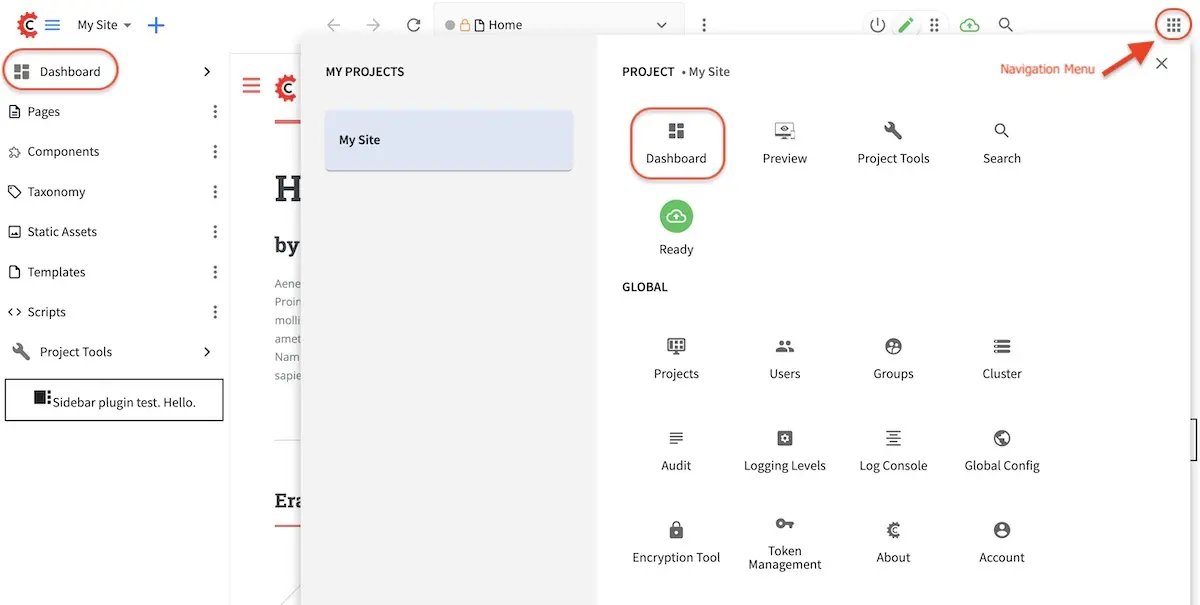
You may also open the Dashboard anywhere via the Launcher, which is opened by clicking the apps icon on the
top right:
Here’s the auto-wired section in the configuration after installing the plugin:
 1<siteUi>
 2  ...
 3  <widget id="craftercms.components.Dashboard">
 4    <configuration>
 5      <widgets>
 6        <widget id="craftercms.components.AwaitingApprovalDashlet">
 7          <permittedRoles>
 8            <role>admin</role>
 9            <role>developer</role>
10            <role>publisher</role>
11          </permittedRoles>
12        </widget>
13        ...
14        <widget id="org.craftercms.sampleDashboardPlugin.components.reactComponent">
15          <plugin id="org.craftercms.plugin.exampledashboard"
16                  type="dashboard"
17                  name="test-dashboard"
18                  file="index.js"/>
19        </widget>
20        ...
Project Tools
contains tools that project administrators use for daily activities. For more information on the
available tools in , see Navigating Project Tools.
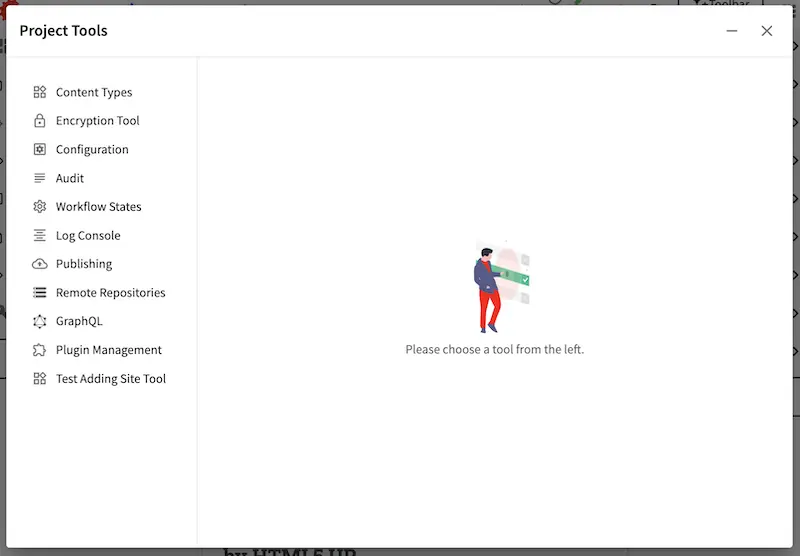
For this example, the plugin type (CATEGORY) is project-tool, the NAME is test-project-tools,
and the plugin.id is org.craftercms.plugin.exampleprojecttools.
<plugin-folder>/
  craftercms-plugin.yaml
  authoring/
    static-assets/
      plugins/
        org/
          craftercms/
            plugin/
              exampleprojecttools/
                project-tool/
                  test-project-tools/
Add the following installation block to your craftercms-plugin.yaml descriptor file:
 1installation:
 2  - type: preview-app
 3    parentXpath: //reference[@id='craftercms.siteTools']
 4    elementXpath: //plugin[@id='org.craftercms.sampleProjectToolsPlugin.components.reactComponent']
 5    element:
 6      name: tools
 7      children:
 8      - name: tool
 9        children:
10        - name: title
11          attributes:
12          - name: id
13            value: "test.projecttool"
14          - name: defaultMessage
15            value: "Test Adding Project Tool"
16        - name: icon
17          attributes:
18          - name: id
19            value: "@mui/icons-material/WidgetsOutlined"
20        - name: url
21          value: test
22        - name: widget
23          attributes:
24          - name: id
25            value: org.craftercms.sampleProjectToolsPlugin.components.reactComponent
26          children:
27          - name: plugin
28            attributes:
29            - name: id
30              value: org.craftercms.plugin.exampleprojecttools
31            - name: type
32              value: project-tool
33            - name: name
34              value: test-project-tools
35            - name: file
36              value: index.js
To see the plugin in action, click on the CrafterCMS logo at the top left of your browser to open the sidebar,
then click on Project Tools:
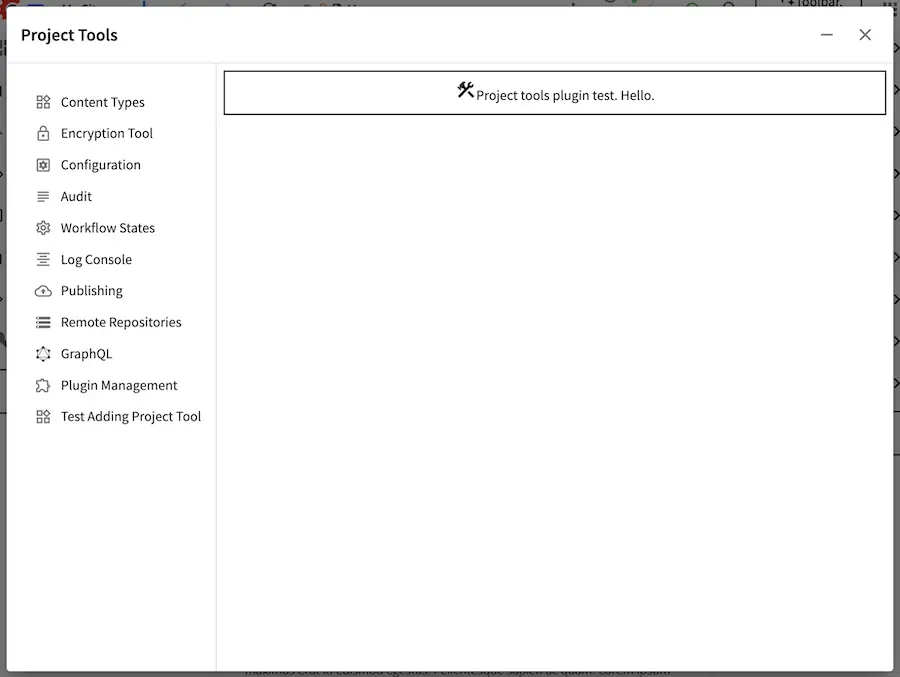
Here’s the auto-wired section in the configuration after installing the plugin:
 1<siteUi>
 2  ...
 3  <references>
 4    <reference id="craftercms.siteTools">
 5      <tools>
 6        ...
 7        <tool>
 8          <title id="PluginManagement.title" defaultMessage="Plugin Management"/>
 9          <icon id="@mui/icons-material/ExtensionOutlined"/>
10          <url>plugins</url>
11          <widget id="craftercms.components.PluginManagement"/>
12        </tool>
13        <tool>
14          <title id="test.sitetool" defaultMessage="Test Adding Project Tool"/>
15          <icon id="@mui/icons-material/WidgetsOutlined"/>
16          <url>test</url>
17          <widget id="org.craftercms.sampleProjectToolsPlugin.components.reactComponent">
18             <plugin id="org.craftercms.plugin.exampleprojecttools"
19                     type="project-tool"
20                     name="test-project-tools"
21                     file="index.js"/>
22          </widget>
23        </tool>
24      </tools>
25    ...
Navigation Menu
The Navigation Menu (Launcher) contains tools that are used for daily activities by users. For more information on the Navigation Menu, see here.
For this example, the plugin type (CATEGORY) is navmenu, the NAME is test-navmenu, and the
plugin.id is org.craftercms.plugin.examplenavmenu.
<plugin-folder>/
  craftercms-plugin.yaml
  authoring/
    static-assets/
      plugins/
        org/
          craftercms/
            plugin/
              examplenavmenu/
                navmenu/
                  test-navmenu/
Add the following installation block to your craftercms-plugin.yaml descriptor file:
 1installation:
 2  - type: preview-app
 3    parentXpath: //widget[@id='craftercms.components.Launcher']
 4    elementXpath: //plugin[@id='org.craftercms.sampleNavMenuPlugin.components.reactComponent']
 5    element:
 6      name: configuration
 7      children:
 8      - name: widgets
 9        children:
10        - name: widget
11          children:
12          - name: configuration
13            children:
14            - name: widgets
15              children:
16              - name: widget
17                attributes:
18                - name: id
19                  value: org.craftercms.sampleNavMenuPlugin.components.reactComponent
20                children:
21                - name: plugin
22                  attributes:
23                  - name: id
24                    value: org.craftercms.plugin.examplenavmenu
25                  - name: type
26                    value: navmenu
27                  - name: name
28                    value: test-navmenu
29                  - name: file
30                    value: index.js
To see the plugin in action, click on the Navigation Menu icon on the top right:
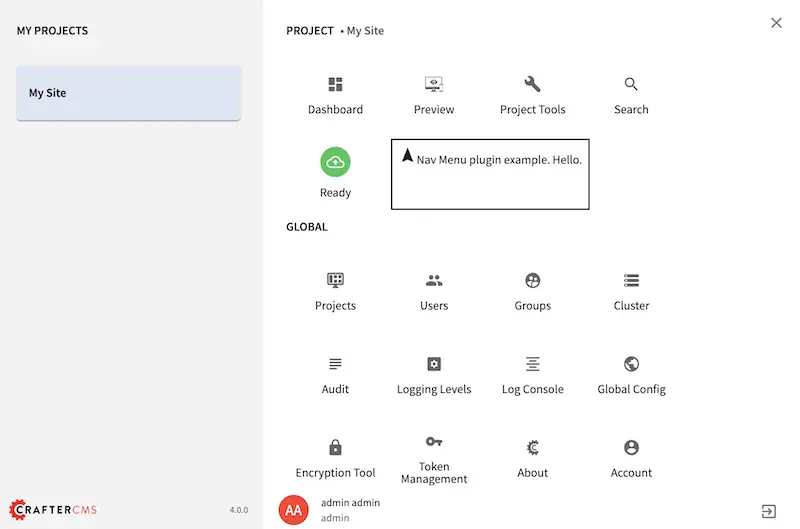
Here’s the auto-wired section in the configuration after installing the plugin:
 1<siteUi>
 2  ...
 3  <widget id="craftercms.components.Launcher">
 4    <configuration>
 5      <widgets>
 6        <widget id="craftercms.components.LauncherSection">
 7          <configuration>
 8            <title id="launcher.siteSectionTitle">
 9              <defaultMessage><![CDATA[
10                                     Site <muted>• {siteName}</muted>]]></defaultMessage>
11            </title>
12            <widgets>
13              <widget id="craftercms.components.LauncherLinkTile">
14                <configuration>
15                  <title id="words.dashboard" defaultMessage="Dashboard"/>
16                  <systemLinkId>siteDashboardDialog</systemLinkId>
17                  <icon id="@mui/icons-material/DashboardRounded"/>
18                </configuration>
19              </widget>
20              ...
21              <widget id="craftercms.components.LauncherPublishingStatusTile"/>
22              <widget id="org.craftercms.sampleNavMenuPlugin.components.reactComponent">
23                <plugin id="org.craftercms.plugin.examplenavmenu"
24                        type="navmenu"
25                        name="test-navmenu"
26                        file="index.js"/>
27              </widget>
28              ...
Translations Override
This plugin example shows the user how to override the translations for the example placeholder text in the Author
filter of the Activity widget in the Dashboard.
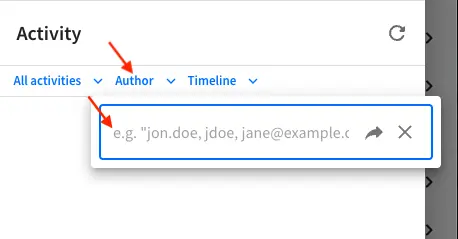
Here’s the plugin directory structure for our example:
<plugin-folder>/
  craftercms-plugin.yaml
  authoring/
    static-assets/
      plugins/
        org/
          craftercms/
            examples/
              library/
                index.js
  translations-library/
    src/
      components/
        Translations.tsx
      i18n/
        translations/
          de.json
          en.json
          es.json
          ko.json
Below are the sample files listed in the structure above. For the translations files, examples for English and Korean are provided. Simply click on the triangle next to the summary to expand/collapse the file contents.
Translation override example index.js file
 1var w7YdZu$3 = "e.g. my-user, author@mail.com";
 2var en = {
 3    w7YdZu: w7YdZu$3,
 4    "words.activity": "System Activity"
 5};
 6
 7var w7YdZu$2 = "ej: mi-usuario, autor@mail.com";
 8var es = {
 9    w7YdZu: w7YdZu$2,
10    "words.activity": "Actividad del sistema"
11};
12
13var w7YdZu$1 = "z.B. mein-benutzer, autor@mail.com";
14var de = {
15    w7YdZu: w7YdZu$1,
16    "words.activity": "Systemaktivität"
17};
18
19var w7YdZu = "예: my-user, author@mail.com";
20var ko = {
21    w7YdZu: w7YdZu,
22    "words.activity": "시스템 활동"
23};
24
25function Translations() {
26    return null;
27}
28
29var plugin = {
30    id: 'org.craftercms.examples.componentLibrary',
31    locales: {
32        en: en,
33        es: es,
34        de: de,
35        ko: ko
36    },
37    widgets: {
38        'org.craftercms.examples.translations': Translations
39    },
40    scripts: [
41    // Below are examples of how to load scripts into the Studio runtime
42    // {
43    //   src: 'https://code.jquery.com/jquery-3.5.1.min.js',
44    //   integrity: 'sha256-9/aliU8dGd2tb6OSsuzixeV4y/faTqgFtohetphbbj0=',
45    //   crossorigin: 'anonymous'
46    // },
47    // 'script.js'
48    ],
49    stylesheets: [
50    // Examples of how to load stylesheets into the Studio runtime
51    // 'index.css'
52    ]
53};
54
55export { Translations, plugin as default };
Translation override example Translations.tsx file
export function Translations() {
    return null;
}

export default Translations;
Translation override example en.json file
{
    "w7YdZu": "e.g. my-user, author@mail.com"
}
Translation override example ko.json file
{
    "w7YdZu": "예: my-user, author@mail.com"
}
Add the following installation block to your craftercms-plugin.yaml descriptor file:
 1installation:
 2  - type: preview-app
 3    parentXpath: //widget[@id='craftercms.components.ToolsPanel']
 4    elementXpath: //widget[@id='org.craftercms.examples.translations']
 5    element:
 6      name: configuration
 7      children:
 8        - name: widgets
 9          children:
10            - name: widget
11              attributes:
12                - name: id
13                  value: org.craftercms.examples.translations
14              children:
15                - name: plugin
16                  attributes:
17                    - name: id
18                      value: org.craftercms
19                    - name: type
20                      value: examples
21                    - name: name
22                      value: library
23                    - name: file
24                      value: index.js
To see the plugin in action, open the Dashboard then click on Author in the Activity widget:
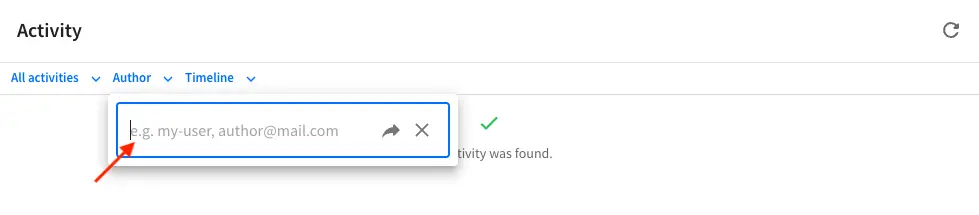
Here’s the auto-wired section in the configuration after installing the plugin:
 1<siteUi>
 2  ...
 3  <widget id="craftercms.components.ToolsPanel">
 4   <configuration>
 5      <widgets>
 6         <widget id="craftercms.components.ToolsPanelEmbeddedAppViewButton">
 7            <configuration>
 8               <title id="words.dashboard" defaultMessage="Dashboard"/>
 9               <icon id="@mui/icons-material/DashboardRounded"/>
10               <widget id="craftercms.components.SiteDashboard"/>
11            </configuration>
12         </widget>
13         ...
14         <widget id="org.craftercms.examples.translations">
15            <plugin id="org.craftercms"
16                    type="examples"
17                    name="library"
18                    file="index.js"/>
19         </widget>
Form Engine Control and Data Source
Crafter Studio allows plugins for Form Engine controls and data sources through the getPluginFile API found
here.
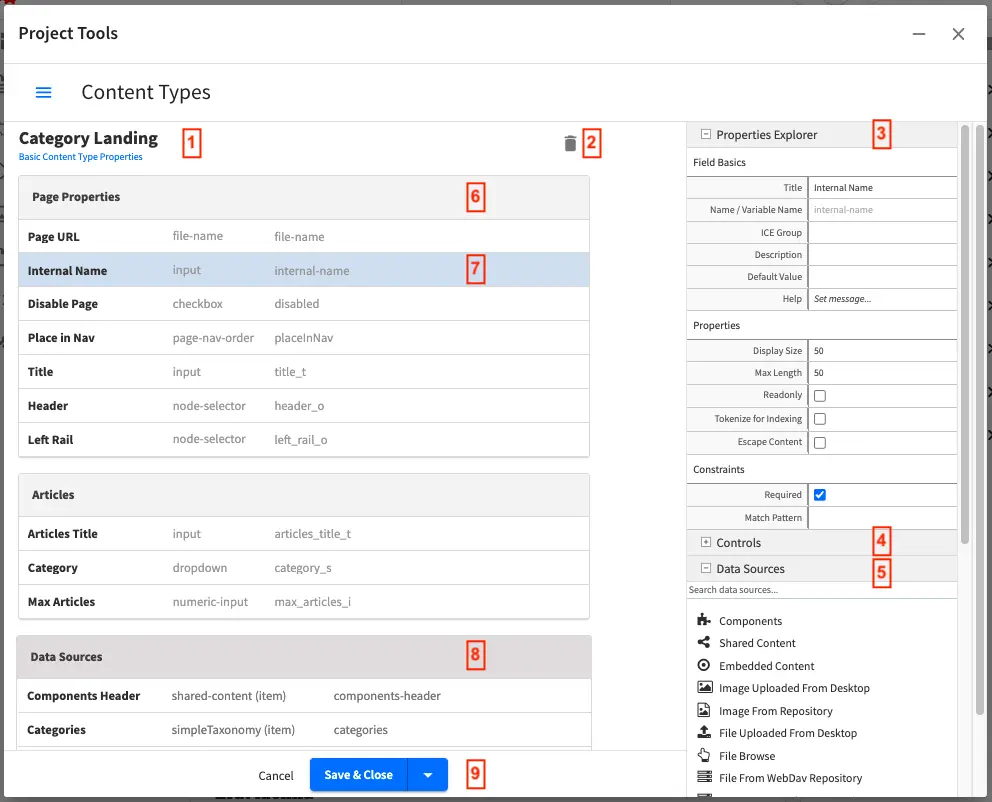
Form Engine controls (#4 in the image above) are UX elements that help authors capture and edit content and metadata properties. Form Engine data sources (#5) are swappable components that controls delegate to for retrieving the content authors select. Controls should be written independently of the data they capture so they can be reused across a wide range of data sets.
The process for creating and installing a Form Engine plugin is the same for controls and data sources:
Create the folder structure and
craftercms-plugin.yamldescriptor fileImplement the JavaScript interface in
main.jsAdd an
installationblock to auto-wire the pluginInstall the plugin with
crafter-cli copy-pluginVerify the plugin in the Content Type Editor
The only differences are the JavaScript interface, directory CATEGORY (control vs datasource),
installation block, and the section of site-config-tools.xml where the plugin is registered. Both are
covered below.
Form Engine Control Plugin
What is a Control
A form control is a UX element to help authors capture and edit content and metadata properties. Crafter Studio form controls should be written in a way that makes them independent of the data they allow the user to select so that they can be (re)used across a wide range of data sets.
Out of the box controls are:
Control |
Description |
|---|---|
|
Create a new section in the form, this is to help the content authors by segmenting a form into sections of similar concern. Details are in the Form Section Control page. |
|
Repeating groups are used when the form has one or several controls that repeat to capture the same data as records. For example: a list of images in a carousel, or a list of widgets on a page. Details are in the Repeating Group Control page. |
|
A simple textual input line. Details are in the Input Control page. |
|
A simple numeric input line. Details are in the Numeric Input Control page. |
|
A simple block of plain text. Details are in the Text Area Control page. |
|
A block of HTML. Details are in the Rich Text Editor Control page. |
|
Dropdown list of items to pick from. Details are in the Dropdown Control page. |
|
Date and Time field with a picker. Details are in the Date/Time Control page. |
|
Time field with a picker. Details are in the Time Control page. |
|
True/False checkbox. Details are in the Checkbox Control page. |
|
Several checkboxes (true/false). Details are in the Grouped Checkboxes Control page. |
|
Item selector from a Data Source. Details are in the Item Selector Control page. |
|
Image selector from a Data Source. Details are in the Image Control page. |
|
Video selector from a Data Source. Details are in the Video Control page. |
|
Transcoded Video selector from Video Transcoding Data Source. Details are in the Transcoded Video Control page. |
|
Displays text. Details are in the Label Control page. |
|
Allows changing the page order. Details are in the Page Order Control page. |
|
A simple text filename. Details are in the Filename Control page. |
|
Details are in the Auto Filename Control page. |
|
Details are in the Internal Name Control page. |
|
Details are in the Locale Selector Control page. |




















The anatomy of a Control Project Plugin
Form Engine Control consist of (at a minimum)
A single JavaScript file which implements the control interface.
The JS file name and the control name in the configuration does not need to be the same. The JS file name can be any meaningful name, different from the control name in the configuration.
Configuration in a Crafter Studio project to make that control available for use
Control Interface
 1/**
 2 * Constructor: Where .X is substituted with your class name
 3 * ID is the variable name
 4 * FORM is the form object
 5 * OWNER is the parent section/form
 6 * PROPERTIES is the collection of configured property values
 7 * CONSTRAINTS is the collection of configured constraint values
 8 * READONLY is a true/false flag indicating re-only mode
 9 */
10CStudioForms.Controls.X = CStudioForms.Controls.X ||
11function(id, form, owner, properties, constraints, readonly)  { }
12
13YAHOO.extend(CStudioForms.Controls.X, CStudioForms.CStudioFormField, {
14
15  /**
16   * Return a user friendly name for the control (will show up in content type builder UX)
17   */
18  getLabel: function() { },
19
20  /**
21   * method is called by the engine when the value of the control is changed
22   */
23  _onChange: function(evt, obj) { },
24
25  /**
26   * method is called by the engine to invoke the control to render. The control is responsible for creating and managing its own HTML.
27   * CONFIG is a structure containing the form definition and other control configuration
28   * CONTAINER EL is the containing element the control is to render in to.
29   */
30  render: function(config, containerEl) { },
31
32   /**
33    * returns the current value of the control
34    */
35   getValue: function() { },
36
37   /**
38    * sets the value of the control
39    */
40   setValue: function(value) { },
41
42   /**
43    * return a string that represents the kind of control (this is the same as the file name)
44    */
45   getName: function() {  },
46
47   /**
48    * return a list of properties supported by the control.
49    * properties is an array of objects with the following structure { label: "", name: "", type: "" }
50    */
51   getSupportedProperties: function() { },
52
53   /**
54    * return a list of constraints supported by the control.
55    * constraints is an array of objects with the following structure { label: "", name: "", type: "" }
56    */
57   getSupportedConstraints: function() { }
58});
Control Plugin Directory and Example
When creating control plugins, the JS file goes in the following location:
authoring/static-assets/plugins/{yourPluginId}/control/{yourPluginName}/JS_FILE.js
where {yourPluginName} is the name of the form engine control plugin and JS_FILE.js is the JavaScript file containing the control interface implementation.
Let’s take a look at an example of a control plugin. We will be adding a control named text-input to
My Editorial.
For this example, the plugin.id is org.craftercms.plugin.excontrol, the CATEGORY is control,
the NAME is text-input, and the JS file is main.js.
<plugin-folder>/
  craftercms-plugin.yaml
  authoring/
    static-assets/
      plugins/
        org/
          craftercms/
            plugin/
              excontrol/
                control/
                  text-input/
                    main.js
For our example, the <plugin-folder> is located here: /users/myuser/myplugins/form-control-plugin
In the JS file, please note that the CStudioAuthoring.Module is required and that the prefix for
CStudioAuthoring.Module.moduleLoaded must be the name of the control. For our example, the prefix is
text-input as shown in the example.
 1CStudioForms.Controls.textInput = CStudioForms.Controls.textInput ||
 2function(id, form, owner, properties, constraints, readonly)  {
 3    this.owner = owner;
 4    this.owner.registerField(this);
 5    this.errors = [];
 6    this.properties = properties;
 7    this.constraints = constraints;
 8    this.inputEl = null;
 9    this.patternErrEl = null;
10    this.countEl = null;
11    this.required = false;
12    this.value = "_not-set";
13    this.form = form;
14    this.id = id;
15    this.readonly = readonly;
16
17    return this;
18}
19
20YAHOO.extend(CStudioForms.Controls.textInput, CStudioForms.CStudioFormField, {
21
22    getLabel: function() {
23        return CMgs.format(langBundle, "Text Input");
24    },
25    .
26    .
27    .
28
29    getName: function() {
30            return "text-input";
31    },
32
33    getSupportedProperties: function() {
34        return [
35                { label: CMgs.format(langBundle, "displaySize"), name: "size", type: "int", defaultValue: "50" },
36                { label: CMgs.format(langBundle, "maxLength"), name: "maxlength", type: "int",  defaultValue: "50" },
37                { label: CMgs.format(langBundle, "readonly"), name: "readonly", type: "boolean" },
38                { label: "Tokenize for Indexing", name: "tokenize", type: "boolean",  defaultValue: "false" }
39        ];
40    },
41
42    getSupportedConstraints: function() {
43        return [
44                { label: CMgs.format(langBundle, "required"), name: "required", type: "boolean" },
45                { label: CMgs.format(langBundle, "matchPattern"), name: "pattern", type: "string" },
46        ];
47    }
48
49});
50
51CStudioAuthoring.Module.moduleLoaded("text-input", CStudioForms.Controls.textInput);
Here’s the complete example form control plugin file for the text-input control (click on the triangle on the left to expand/collapse):
Sample form control plugin file "main.js".
  1CStudioForms.Controls.textInput = CStudioForms.Controls.textInput ||
  2    function(id, form, owner, properties, constraints, readonly)  {
  3        this.owner = owner;
  4        this.owner.registerField(this);
  5        this.errors = [];
  6        this.properties = properties;
  7        this.constraints = constraints;
  8        this.inputEl = null;
  9        this.patternErrEl = null;
 10        this.countEl = null;
 11        this.required = false;
 12        this.value = "_not-set";
 13        this.form = form;
 14        this.id = id;
 15        this.readonly = readonly;
 16
 17        return this;
 18    }
 19
 20    YAHOO.extend(CStudioForms.Controls.textInput, CStudioForms.CStudioFormField, {
 21
 22        getLabel: function() {
 23            return "Text Input";
 24        },
 25
 26        _onChange: function(evt, obj) {
 27            obj.value = obj.inputEl.value;
 28
 29            // Empty error state before new validation (for a clean state)
 30            YAHOO.util.Dom.removeClass(obj.patternErrEl, 'on');
 31            obj.clearError('pattern');
 32
 33            var validationExist = false;
 34            var validationResult = true;
 35            if (obj.required) {
 36              if (obj.inputEl.value == '') {
 37                obj.setError('required', 'Field is Required');
 38                validationExist = true;
 39                validationResult = false;
 40              } else {
 41                obj.clearError('required');
 42                validationExist = true;
 43              }
 44            }
 45
 46            if ((!validationExist && obj.inputEl.value != '') || (validationExist && validationResult)) {
 47              for (var i = 0; i < obj.constraints.length; i++) {
 48                var constraint = obj.constraints[i];
 49                if (constraint.name == 'pattern') {
 50                  var regex = constraint.value;
 51                  if (regex != '') {
 52                    if (obj.inputEl.value.match(regex)) {
 53                      // only when there is no other validation mark it as passed
 54                      obj.clearError('pattern');
 55                      YAHOO.util.Dom.removeClass(obj.patternErrEl, 'on');
 56                      validationExist = true;
 57                    } else {
 58                      if (obj.inputEl.value != '') {
 59                        YAHOO.util.Dom.addClass(obj.patternErrEl, 'on');
 60                      }
 61                      obj.setError('pattern', 'The value entered is not allowed in this field.');
 62                      validationExist = true;
 63                      validationResult = false;
 64                    }
 65                  }
 66
 67                  break;
 68                }
 69              }
 70            }
 71            // actual validation is checked by # of errors
 72            // renderValidation does not require the result being passed
 73            obj.renderValidation(validationExist, validationResult);
 74            obj.owner.notifyValidation();
 75            const valueToSet = obj.escapeContent ? CStudioForms.Util.escapeXml(obj.getValue()) : obj.getValue();
 76            obj.form.updateModel(obj.id, valueToSet);
 77          },
 78
 79          _onChangeVal: function(evt, obj) {
 80            obj.edited = true;
 81            if (this._onChange) {
 82              this._onChange(evt, obj);
 83            }
 84          },
 85
 86          /**
 87           * perform count calculation on keypress
 88           * @param evt event
 89           * @param el element
 90           */
 91          count: function(evt, countEl, el) {
 92            // 'this' is the input box
 93            el = el ? el : this;
 94            var text = el.value;
 95
 96            var charCount = text.length ? text.length : el.textLength ? el.textLength : 0;
 97            var maxlength = el.maxlength && el.maxlength != '' ? el.maxlength : -1;
 98
 99            if (maxlength != -1) {
100              if (charCount > el.maxlength) {
101                // truncate if exceeds max chars
102                if (charCount > el.maxlength) {
103                  this.value = text.substr(0, el.maxlength);
104                  charCount = el.maxlength;
105                }
106
107                if (
108                  evt &&
109                  evt != null &&
110                  evt.keyCode != 8 &&
111                  evt.keyCode != 46 &&
112                  evt.keyCode != 37 &&
113                  evt.keyCode != 38 &&
114                  evt.keyCode != 39 &&
115                  evt.keyCode != 40 && // arrow keys
116                  evt.keyCode != 88 &&
117                  evt.keyCode != 86
118                ) {
119                  // allow backspace and
120                  // delete key and arrow keys (37-40)
121                  // 86 -ctrl-v, 90-ctrl-z,
122                  if (evt) YAHOO.util.Event.stopEvent(evt);
123                }
124              }
125            }
126
127            if (maxlength != -1) {
128              countEl.innerHTML = charCount + ' / ' + el.maxlength;
129            } else {
130              countEl.innerHTML = charCount;
131            }
132          },
133
134          render: function(config, containerEl) {
135            // we need to make the general layout of a control inherit from common
136            // you should be able to override it -- but most of the time it wil be the same
137            containerEl.id = this.id;
138
139            var titleEl = document.createElement('span');
140
141            YAHOO.util.Dom.addClass(titleEl, 'cstudio-form-field-title');
142            titleEl.textContent = config.title;
143
144            var controlWidgetContainerEl = document.createElement('div');
145            YAHOO.util.Dom.addClass(controlWidgetContainerEl, 'cstudio-form-control-input-container');
146
147            var validEl = document.createElement('span');
148            YAHOO.util.Dom.addClass(validEl, 'validation-hint');
149            YAHOO.util.Dom.addClass(validEl, 'cstudio-form-control-validation fa fa-check');
150
151            var inputEl = document.createElement('input');
152            this.inputEl = inputEl;
153            YAHOO.util.Dom.addClass(inputEl, 'datum');
154            YAHOO.util.Dom.addClass(inputEl, 'cstudio-form-control-input');
155
156            const valueToSet = this.escapeContent ? CStudioForms.Util.unEscapeXml(this.value) : this.value;
157            inputEl.value = this.value === '_not-set' ? config.defaultValue : valueToSet;
158            controlWidgetContainerEl.appendChild(inputEl);
159
160            YAHOO.util.Event.on(
161              inputEl,
162              'focus',
163              function(evt, context) {
164                context.form.setFocusedField(context);
165              },
166              this
167            );
168
169            YAHOO.util.Event.on(inputEl, 'change', this._onChangeVal, this);
170            YAHOO.util.Event.on(inputEl, 'blur', this._onChange, this);
171
172            for (var i = 0; i < config.properties.length; i++) {
173              var prop = config.properties[i];
174
175              if (prop.name == 'size') {
176                inputEl.size = prop.value;
177              }
178
179              if (prop.name == 'maxlength') {
180                inputEl.maxlength = prop.value;
181              }
182
183              if (prop.name == 'readonly' && prop.value == 'true') {
184                this.readonly = true;
185              }
186
187              if (prop.name === 'escapeContent' && prop.value === 'true') {
188                this.escapeContent = true;
189              }
190            }
191
192            if (this.readonly == true) {
193              inputEl.disabled = true;
194            }
195
196            var countEl = document.createElement('div');
197            YAHOO.util.Dom.addClass(countEl, 'char-count');
198            YAHOO.util.Dom.addClass(countEl, 'cstudio-form-control-input-count');
199            controlWidgetContainerEl.appendChild(countEl);
200            this.countEl = countEl;
201
202            var patternErrEl = document.createElement('div');
203            patternErrEl.innerHTML = 'The value entered is not allowed in this field.';
204            YAHOO.util.Dom.addClass(patternErrEl, 'cstudio-form-control-input-url-err');
205            controlWidgetContainerEl.appendChild(patternErrEl);
206            this.patternErrEl = patternErrEl;
207
208            YAHOO.util.Event.on(inputEl, 'keyup', this.count, countEl);
209            YAHOO.util.Event.on(inputEl, 'keypress', this.count, countEl);
210            YAHOO.util.Event.on(inputEl, 'mouseup', this.count, countEl);
211
212            this.renderHelp(config, controlWidgetContainerEl);
213
214            var descriptionEl = document.createElement('span');
215            YAHOO.util.Dom.addClass(descriptionEl, 'description');
216            YAHOO.util.Dom.addClass(descriptionEl, 'cstudio-form-field-description');
217            descriptionEl.textContent = config.description;
218
219            containerEl.appendChild(titleEl);
220            containerEl.appendChild(validEl);
221            containerEl.appendChild(controlWidgetContainerEl);
222            containerEl.appendChild(descriptionEl);
223          },
224
225          getValue: function() {
226            return this.value;
227          },
228
229          setValue: function(value) {
230            const valueToSet = this.escapeContent ? CStudioForms.Util.unEscapeXml(value) : value;
231
232            this.value = valueToSet;
233            this.inputEl.value = valueToSet;
234            this.count(null, this.countEl, this.inputEl);
235            this._onChange(null, this);
236            this.edited = false;
237          },
238
239          getName: function() {
240            return "text-input";
241    },
242
243    getSupportedProperties: function() {
244        return [
245            { label: CMgs.format(langBundle, "displaySize"), name: "size", type: "int", defaultValue: "50" },
246            { label: CMgs.format(langBundle, "maxLength"), name: "maxlength", type: "int",  defaultValue: "50" },
247            { label: CMgs.format(langBundle, "readonly"), name: "readonly", type: "boolean" },
248            { label: "Tokenize for Indexing", name: "tokenize", type: "boolean",  defaultValue: "false" }
249        ];
250    },
251
252    getSupportedConstraints: function() {
253        return [
254            { label: CMgs.format(langBundle, "required"), name: "required", type: "boolean" },
255            { label: CMgs.format(langBundle, "matchPattern"), name: "pattern", type: "string" },
256        ];
257    }
258
259});
260
261CStudioAuthoring.Module.moduleLoaded("text-input", CStudioForms.Controls.textInput);
Saving additional form control elements to XML
To save additional elements from your form control into the XML content, call registerDynamicField from the form when initializing the form control. When updateField is called, your element will be saved into the XML content.
this.form.registerDynamicField(this.timezoneId);
See here for an example of calling registerDynamicField in the date-time form control code.
Auto-wiring and Installing a Control Plugin
To setup our form control to be automatically wired in the corresponding configuration file in Studio (which for a form control, is the Project Config Tools Configuration file) during the installation, add the following to your craftercms-plugin.yaml descriptor file:
 1installation:
 2 - type: form-control
 3   elementXpath: //control/plugin[pluginId='org.craftercms.plugin.excontrol']
 4   element:
 5     name: control
 6     children:
 7       - name: plugin
 8         children:
 9           - name: pluginId
10             value: org.craftercms.plugin.excontrol
11           - name: type
12             value: control
13           - name: name
14             value: text-input
15           - name: filename
16             value: main.js
17       - name: icon
18         children:
19           - name: class
20             value: fa-pencil-square-o
See CrafterCMS Plugin Descriptor for more information on setting up automatic wiring of your plugin in Studio.
After placing your JS file, the plugin may now be installed for testing/debugging using the crafter-cli command copy-plugin.
When running a crafter-cli command, the connection to CrafterCMS needs to be setup via the add-environment command. Once the connection has been established, we can now install the plugin to the project my-editorial by running the following:
./crafter-cli copy-plugin -e local -s my-editorial --path /users/myuser/myplugins/form-control-plugin
Let’s take a look at the auto-wiring performed during installation of the plugin. Form controls are setup in the site-config-tools.xml file.
The items we setup in the descriptor file for auto-wiring above should now be in the Project Config Tools configuration file, which can be accessed by opening the Sidebar, then clicking on -> Configuration -> Project Config Tools
Location (In Repository) SITENAME/config/studio/administration/site-config-tools.xml
 1<controls>
 2    <control>
 3        <name>auto-filename</name>
 4        .
 5        .
 6    </control>
 7    .
 8    .
 9    <control>
10        <plugin>
11            <pluginId>org.craftercms.plugin.excontrol</pluginId>
12            <type>control</type>
13            <name>text-input</name>
14            <filename>main.js</filename>
15        </plugin>
16        <icon>
17            <class>fa-pencil-square-o</class>
18        </icon>
19    </control>
20</controls>
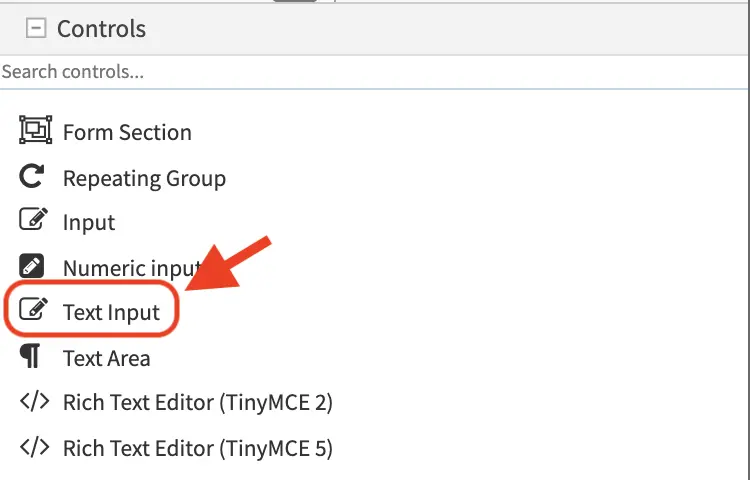
Here’s our plugin control added to the list of controls in content types:
Form Engine Data Source Plugin
What is a Data Source
Crafter Studio form controls should be written in a way that makes them independent of the data they allow the user to select so that they can be (re)used across a wide range of data sets. To accomplish this objective we use a data source pattern where by the form control widget code is concerned with rendering and facilitating the data capture/selection process but delegates the retrieval of the content to a separate swappable component interface known as a data source.
Out of the box data sources are:


























The anatomy of a Data Source Project Plugin
Data Sources consist of (at a minimum)
A single JavaScript file which implements the data source interface.
The JS file name and the data source name in the configuration does not need to be the same. The JS file name can be any meaningful name, different from the data source name in the configuration.
Configuration in a Crafter Studio project to make that data source available for use.
Data Source Interface
 1/**
 2 * Constructor: Where .X is substituted with your class name
 3 */
 4CStudioForms.Datasources.X = CStudioForms.Datasources.X ||
 5function(id, form, properties, constraints)  {
 6}
 7
 8/**
 9 * Extension of the base class
10 */
11YAHOO.extend(CStudioForms.Datasources.X, CStudioForms.CStudioFormDatasource, {
12
13    /**
14     * Return a user friendly name for the data source (will show up in content type builder UX
15     */
16    getLabel: function() {  },
17
18    /**
19     * return a string that represents the type of data returned by the data source
20     * This is often of type "item"
21     */
22    getInterface: function() { },
23
24    /**
25     * return a string that represents the kind of data source (this is the same as the file name)
26     */
27    getName: function() { },
28
29    /**
30     * return a list of properties supported by the data source.
31     * properties is an array of objects with the following structure { label: "", name: "", type: "" }
32     */
33    getSupportedProperties: function() { },
34
35    /**
36     * method responsible for getting the actual values. Caller must pass callback which meets interface:
37     * { success: function(list) {}, failure: function(exception) }
38     */
39    getList: function(cb) { }
40});
Data Source Plugin Directory and Example
When creating data source plugins, the JS file goes in the following location:
authoring/static-assets/plugins/{yourPluginId}/datasource/{yourPluginName}/JS_FILE.js
where {yourPluginName} is the name of the form engine data source plugin and JS_FILE.js is the JavaScript file containing the data source interface implementation.
Let’s take a look at an example of a data source plugin. We will be adding a data source named parent-content.
For this example, the plugin.id is org.craftercms.plugin.examples, the CATEGORY is datasource,
the NAME is parent-content, and the JS file is main.js.
<plugin-folder>/
  craftercms-plugin.yaml
  authoring/
    static-assets/
      plugins/
        org/
          craftercms/
            plugin/
              examples/
                datasource/
                  parent-content/
                    main.js
For our example, the <plugin-folder> is located here: /users/myuser/myplugins/form-datasource-plugin
In the JS file, please note that the CStudioAuthoring.Module is required and that the prefix for
CStudioAuthoring.Module.moduleLoaded must be the name of the data source. For our example, the prefix is
parent-content as shown in the example.
 1CStudioForms.Datasources.ParentContent= CStudioForms.Datasources.ParentContent ||
 2function(id, form, properties, constraints)  {
 3    this.id = id;
 4    this.form = form;
 5    this.properties = properties;
 6    this.constraints = constraints;
 7    this.selectItemsCount = -1;
 8    this.type = "";
 9    this.defaultEnableCreateNew = true;
10    this.defaultEnableBrowseExisting = true;
11    this.countOptions = 0;
12
13    for(var i=0; i<properties.length; i++) {
14            if(properties[i].name == "repoPath") {
15                    this.repoPath = properties[i].value;
16            }
17            if(properties[i].name == "browsePath") {
18                    this.browsePath = properties[i].value;
19            }
20
21            if(properties[i].name == "type"){
22                    this.type = (Array.isArray(properties[i].value))?"":properties[i].value;
23            }
24
25        if(properties[i].name === "enableCreateNew"){
26            this.enableCreateNew = properties[i].value === "true" ? true : false;
27            this.defaultEnableCreateNew = false;
28            properties[i].value === "true" ? this.countOptions ++ : null;
29        }
30
31        if(properties[i].name === "enableBrowseExisting"){
32            this.enableBrowseExisting = properties[i].value === "true" ? true : false;
33            this.defaultEnableBrowseExisting = false;
34            properties[i].value === "true" ? this.countOptions ++ : null;
35        }
36    }
37
38    if(this.defaultEnableCreateNew){
39        this.countOptions ++;
40    }
41    if(this.defaultEnableBrowseExisting){
42        this.countOptions ++;
43    }
44
45    return this;
46}
47
48YAHOO.extend(CStudioForms.Datasources.ParentContent, CStudioForms.CStudioFormDatasource, {
49    .
50    .
51    .
52    getName: function() {
53            return "parent-content";
54    },
55
56    getSupportedProperties: function() {
57            return [
58            { label: CMgs.format(langBundle, "Enable Create New"), name: "enableCreateNew", type: "boolean", defaultValue: "true"  },
59            { label: CMgs.format(langBundle, "Enable Browse Existing"), name: "enableBrowseExisting", type: "boolean", defaultValue: "true" },
60                    { label: CMgs.format(langBundle, "repositoryPath"), name: "repoPath", type: "string" },
61                    { label: CMgs.format(langBundle, "browsePath"), name: "browsePath", type: "string" },
62                    { label: CMgs.format(langBundle, "defaultType"), name: "type", type: "string" }
63            ];
64    },
65
66    getSupportedConstraints: function() {
67            return [
68            ];
69    }
70
71});
72
73CStudioAuthoring.Module.moduleLoaded("parent-content", CStudioForms.Datasources.ParentContent);
Here’s the complete example form data source plugin file for the parent-content data source (click on the triangle on the left to expand/collapse):
Sample form data source plugin file "main.js".
  1/*
  2 * Copyright (C) 2007-2021 Crafter Software Corporation. All Rights Reserved.
  3 *
  4 * This program is free software: you can redistribute it and/or modify
  5 * it under the terms of the GNU General Public License version 3 as published by
  6 * the Free Software Foundation.
  7 *
  8 * This program is distributed in the hope that it will be useful,
  9 * but WITHOUT ANY WARRANTY; without even the implied warranty of
 10 * MERCHANTABILITY or FITNESS FOR A PARTICULAR PURPOSE.  See the
 11 * GNU General Public License for more details.
 12 *
 13 * You should have received a copy of the GNU General Public License
 14 * along with this program.  If not, see <http://www.gnu.org/licenses/>.
 15 */
 16
 17CStudioForms.Datasources.ParentContent = function(id, form, properties, constraints) {
 18    this.id = id;
 19    this.form = form;
 20    this.properties = properties;
 21    this.constraints = constraints;
 22    this.selectItemsCount = -1;
 23    this.type = '';
 24    this.defaultEnableCreateNew = true;
 25    this.defaultEnableBrowseExisting = true;
 26    this.countOptions = 0;
 27    //const i18n = CrafterCMSNext.i18n;
 28    //this.formatMessage = i18n.intl.formatMessage;
 29    //this.parentContentDSMessages = i18n.messages.parentContentDSMessages;
 30
 31    for (var i = 0; i < properties.length; i++) {
 32      if (properties[i].name == 'repoPath') {
 33        this.repoPath = properties[i].value;
 34      }
 35      if (properties[i].name == 'browsePath') {
 36        this.browsePath = properties[i].value;
 37      }
 38
 39      if (properties[i].name == 'type') {
 40        this.type = Array.isArray(properties[i].value) ? '' : properties[i].value;
 41      }
 42
 43      if (properties[i].name === 'enableCreateNew') {
 44        this.enableCreateNew = properties[i].value === 'true' ? true : false;
 45        this.defaultEnableCreateNew = false;
 46        properties[i].value === 'true' ? this.countOptions++ : null;
 47      }
 48
 49      if (properties[i].name === 'enableBrowseExisting') {
 50        this.enableBrowseExisting = properties[i].value === 'true' ? true : false;
 51        this.defaultEnableBrowseExisting = false;
 52        properties[i].value === 'true' ? this.countOptions++ : null;
 53      }
 54    }
 55
 56    if (this.defaultEnableCreateNew) {
 57      this.countOptions++;
 58    }
 59    if (this.defaultEnableBrowseExisting) {
 60      this.countOptions++;
 61    }
 62
 63    return this;
 64  };
 65
 66  YAHOO.extend(CStudioForms.Datasources.ParentContent, CStudioForms.CStudioFormDatasource, {
 67    itemsAreContentReferences: true,
 68
 69    createElementAction: function(control, _self, addContainerEl) {
 70      if (this.countOptions > 1) {
 71        control.addContainerEl = null;
 72        control.containerEl.removeChild(addContainerEl);
 73      }
 74      if (_self.type === '') {
 75        CStudioAuthoring.Operations.createNewContent(
 76          CStudioAuthoringContext.site,
 77          _self.processPathsForMacros(_self.repoPath),
 78          false,
 79          {
 80            success: function(formName, name, value) {
 81              control.insertItem(value, formName.item.internalName, null, null, _self.id);
 82              control._renderItems();
 83            },
 84            failure: function() {}
 85          },
 86          true
 87        );
 88      } else {
 89        CStudioAuthoring.Operations.openContentWebForm(
 90          _self.type,
 91          null,
 92          null,
 93          _self.processPathsForMacros(_self.repoPath),
 94          false,
 95          false,
 96          {
 97            success: function(contentTO, editorId, name, value) {
 98              control.insertItem(name, value, null, null, _self.id);
 99              control._renderItems();
100              CStudioAuthoring.InContextEdit.unstackDialog(editorId);
101            },
102            failure: function() {}
103          },
104          [{ name: 'childForm', value: 'true' }]
105        );
106      }
107    },
108
109    browseExistingElementAction: function(control, _self, addContainerEl) {
110      if (this.countOptions > 1) {
111        control.addContainerEl = null;
112        control.containerEl.removeChild(addContainerEl);
113      }
114      // if the browsePath property is set, use the property instead of the repoPath property
115      // otherwise continue to use the repoPath for both cases for backward compatibility
116      var browsePath = _self.repoPath;
117      if (_self.browsePath != undefined && _self.browsePath != '') {
118        browsePath = _self.browsePath;
119      }
120      CStudioAuthoring.Operations.openBrowse(
121        '',
122        _self.processPathsForMacros(browsePath),
123        _self.selectItemsCount,
124        'select',
125        true,
126        {
127          success: function(searchId, selectedTOs) {
128            for (var i = 0; i < selectedTOs.length; i++) {
129              var item = selectedTOs[i];
130              var value = item.internalName && item.internalName != '' ? item.internalName : item.uri;
131              control.insertItem(item.uri, value, null, null, _self.id);
132              control._renderItems();
133            }
134          },
135          failure: function() {}
136        }
137      );
138    },
139
140    add: function(control, onlyAppend) {
141      var CMgs = CStudioAuthoring.Messages;
142      var langBundle = CMgs.getBundle('contentTypes', CStudioAuthoringContext.lang);
143
144      var _self = this;
145
146      var addContainerEl = control.addContainerEl ? control.addContainerEl : null;
147
148      var datasourceDef = this.form.definition.datasources,
149        newElTitle = '';
150
151      for (var x = 0; x < datasourceDef.length; x++) {
152        if (datasourceDef[x].id === this.id) {
153          newElTitle = datasourceDef[x].title;
154        }
155      }
156
157      if (!addContainerEl && (this.countOptions > 1 || onlyAppend)) {
158        addContainerEl = document.createElement('div');
159        control.containerEl.appendChild(addContainerEl);
160        YAHOO.util.Dom.addClass(addContainerEl, 'cstudio-form-control-node-selector-add-container');
161        control.addContainerEl = addContainerEl;
162        control.addContainerEl.style.left = control.addButtonEl.offsetLeft + 'px';
163        control.addContainerEl.style.top = control.addButtonEl.offsetTop + 22 + 'px';
164      }
165
166      if (this.enableCreateNew || this.defaultEnableCreateNew) {
167        if (this.countOptions > 1 || onlyAppend) {
168          addContainerEl.create = document.createElement('div');
169          addContainerEl.appendChild(addContainerEl.create);
170          YAHOO.util.Dom.addClass(addContainerEl.create, 'cstudio-form-controls-create-element');
171
172          var createEl = document.createElement('div');
173          YAHOO.util.Dom.addClass(createEl, 'cstudio-form-control-node-selector-add-container-item');
174          createEl.textContent = CMgs.format(langBundle, 'createNew') + ' - ' + newElTitle;
175          control.addContainerEl.create.appendChild(createEl);
176          var addContainerEl = control.addContainerEl;
177          YAHOO.util.Event.on(
178            createEl,
179            'click',
180            function() {
181              _self.createElementAction(control, _self, addContainerEl);
182            },
183            createEl
184          );
185        } else {
186          _self.createElementAction(control, _self);
187        }
188      }
189
190      if (this.enableBrowseExisting || this.defaultEnableBrowseExisting) {
191        if (this.countOptions > 1 || onlyAppend) {
192          addContainerEl.browse = document.createElement('div');
193          addContainerEl.appendChild(addContainerEl.browse);
194          YAHOO.util.Dom.addClass(addContainerEl.browse, 'cstudio-form-controls-browse-element');
195
196          var browseEl = document.createElement('div');
197          browseEl.textContent = CMgs.format(langBundle, 'browseExisting') + ' - ' + newElTitle;
198          YAHOO.util.Dom.addClass(browseEl, 'cstudio-form-control-node-selector-add-container-item');
199          control.addContainerEl.browse.appendChild(browseEl);
200          var addContainerEl = control.addContainerEl;
201          YAHOO.util.Event.on(
202            browseEl,
203            'click',
204            function() {
205              _self.browseExistingElementAction(control, _self, addContainerEl);
206            },
207            browseEl
208          );
209        } else {
210          _self.browseExistingElementAction(control, _self);
211        }
212      }
213    },
214
215    edit: function(key, control) {
216      var _self = this;
217      CStudioAuthoring.Service.lookupContentItem(CStudioAuthoringContext.site, key, {
218        success: function(contentTO) {
219          CStudioAuthoring.Operations.editContent(
220            contentTO.item.contentType,
221            CStudioAuthoringContext.siteId,
222            contentTO.item.mimeType,
223            contentTO.item.nodeRef,
224            contentTO.item.uri,
225            false,
226            {
227              success: function(contentTO, editorId, name, value) {
228                if (control) {
229                  control.updateEditedItem(value, _self.id);
230                  CStudioAuthoring.InContextEdit.unstackDialog(editorId);
231                }
232              }
233            }
234          );
235        },
236        failure: function() {}
237      });
238    },
239
240    updateItem: function(item, control) {
241      if (item.key && item.key.match(/\.xml$/)) {
242        var getContentItemCb = {
243          success: function(contentTO) {
244            item.value = contentTO.item.internalName || item.value;
245            control._renderItems();
246          },
247          failure: function() {}
248        };
249
250        CStudioAuthoring.Service.lookupContentItem(CStudioAuthoringContext.site, item.key, getContentItemCb);
251      }
252    },
253
254    getLabel: function() {
255      //return this.formatMessage(this.parentContentDSMessages.parentContent);
256      return "Parent Content";
257    },
258
259    getInterface: function() {
260      return 'item';
261    },
262
263    getName: function() {
264      return 'parent-content';
265    },
266
267    getSupportedProperties: function() {
268      return [
269        {
270          label: CMgs.format(langBundle, 'Enable Create New'),
271          name: 'enableCreateNew',
272          type: 'boolean',
273          defaultValue: 'true'
274        },
275        {
276          label: CMgs.format(langBundle, 'Enable Browse Existing'),
277          name: 'enableBrowseExisting',
278          type: 'boolean',
279          defaultValue: 'true'
280        },
281        { label: CMgs.format(langBundle, 'repositoryPath'), name: 'repoPath', type: 'string' },
282        { label: CMgs.format(langBundle, 'browsePath'), name: 'browsePath', type: 'string' },
283        { label: CMgs.format(langBundle, 'defaultType'), name: 'type', type: 'string' }
284      ];
285    },
286
287    getSupportedConstraints: function() {
288      return [];
289    }
290  });
291
292  CStudioAuthoring.Module.moduleLoaded('parent-content', CStudioForms.Datasources.ParentContent);
293
Auto-wiring and Installing a Data Source Plugin
To setup our form data source to be automatically wired in the corresponding configuration file in Studio (which for a form data source, is the Project Config Tools Configuration file) during the installation, add the following to your craftercms-plugin.yaml descriptor file:
 1installation:
 2 - type: form-datasource
 3   elementXpath: //datasource/plugin[pluginId='org.craftercms.plugin.examples']
 4   element:
 5     name: datasource
 6     children:
 7       - name: plugin
 8         children:
 9           - name: pluginId
10             value: org.craftercms.plugin.examples
11           - name: type
12             value: datasource
13           - name: name
14             value: parent-content
15           - name: filename
16             value: main.js
17       - name: icon
18         children:
19           - name: class
20             value: fa-pencil-square-o
See CrafterCMS Plugin Descriptor for more information on setting up automatic wiring of your plugin in Studio.
After placing your JS file, the plugin may now be installed for testing/debugging using the crafter-cli command copy-plugin.
When running a crafter-cli command, the connection to CrafterCMS needs to be setup via the add-environment command. Once the connection has been established, we can now install the plugin to the project my-editorial by running the following:
./crafter-cli copy-plugin -e local -s my-editorial --path /users/myuser/myplugins/form-datasource-plugin
Let’s take a look at the auto-wiring performed during installation of the plugin. Form data sources are setup in the site-config-tools.xml file.
The items we setup in the descriptor file for auto-wiring above should now be in the Project Config Tools configuration file, which can be accessed by opening the Sidebar, then clicking on -> Configuration -> Project Config Tools
Location (In Repository) SITENAME/config/studio/administration/site-config-tools.xml
 1<datasources>
 2    <datasource>
 3        <name>img-desktop-upload</name>
 4        .
 5        .
 6    </datasource>
 7    .
 8    .
 9    <datasource>
10        <plugin>
11            <pluginId>org.craftercms.plugin.examples</pluginId>
12            <type>datasource</type>
13            <name>parent-content</name>
14            <filename>main.js</filename>
15        </plugin>
16        <icon>
17            <class>fa-users</class>
18        </icon>
19    </datasource>
20</datasources>
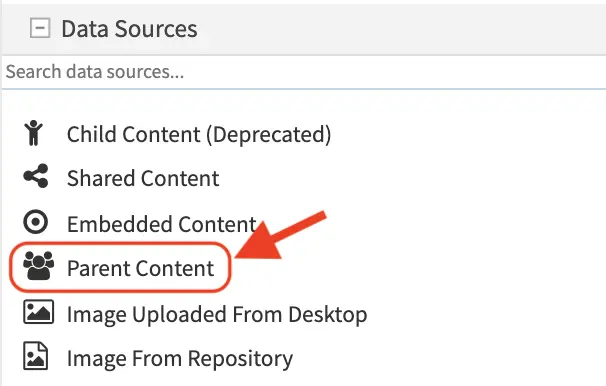
Here’s our plugin data source added to the list of data sources in content types: